In today’s digital age, setting up a web server on your personal computer is no longer a complex task reserved only for IT experts. Thanks to tools like AppServ, you can easily install and manage a powerful local server environment right on your desktop. Whether you’re a student, programmer, or web developer, AppServ brings together all the essential components like Apache, PHP, MySQL, and phpMyAdmin into one convenient package
AppServ is one of the names you must know if you need to install a server on your Desktop. This application will help you save maximum time and not have to set up each software separately. what is AppServ and how to install and use it in the article below.
Table of Contents
What is AppServ?
AppServ is a tool used to set up a free database server. This product was founded by a Phanupong Panyade (Thai technician) and has been widely used in the World in recent years. Users can run AppServ on almost any operating system. However, to ensure stability and optimal efficiency, the manufacturer encourages users to prioritize running AppServ on the Windows operating system.
You only need to install this tool to immediately own a stable Home Server. The main purpose of AppServ is to help users such as programmers and creators set up a server on their personal Desktop for work convenience.
Tests show that AppServ is capable of handling relatively smooth speeds even without an Internet connection. However, AppServ still has its own limitations such as only viewing and using on a single device.
Features of AppServ
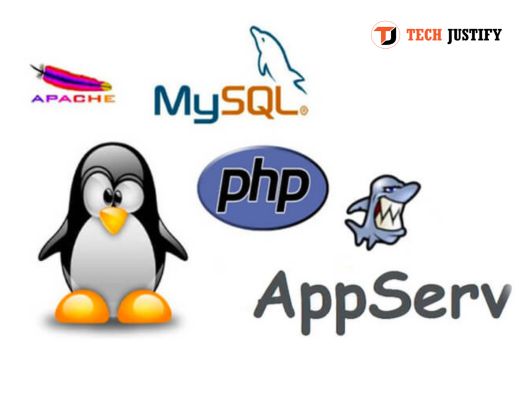
AppServ has the great advantage of fully integrating the features of separate software. That is, with just one installation, you will be able to fully exploit the full range of activities such as:
- Apache: Used to support web server to run stably and smoothly.
- PHP : A useful tool that helps you create a PHP web programming environment . In addition, this tool also integrates additional features such as supporting data processing and storage in the database .
- MySQL: This is one of the popular database systems that is widely used across the globe.
- phpMyAdmin: A tool for SQL management, querying and maintenance that is highly regarded for its simple graphical interface and exceptional ease of use.
Using AppServ, you just need to download and install to be able to fully exploit the above features. However, before installing AppServ, you should learn and consider choosing the most suitable version for your work and learning needs. In general, the latest version is sometimes not necessarily the best. You should consider carefully to choose the most stable version that suits your needs.
According to the developer, AppServ 2.4x is the choice used by many people and is highly appreciated for its optimal performance. You can learn more and consider carefully to make the most appropriate choice.
Detailed instructions on how to install AppServ
AppServ installation steps must fully comply with the following procedure:
Download AppServ
You download the AppServ installation file from the homepage. Depending on the version you choose, you can consider choosing the appropriate AppServ download file. If you want to use it on Windows and are not sure about the support packages, you can choose to try v 9.3.0 or later, this version is highly rated for stability.
Install Localhost using AppServ
After the file download is complete, open the
appserv-win32-2.5.10.exe file you just downloaded, click “Next” to continue and select the “Agree” command to move to the next step. At this point, select the path for the folder or leave it as default depending on your needs. Then, continue to select the “Next” command twice in a row.
Install Apache
After completing the above steps, you will receive the message
“Apache HTTP Server Information” and can start to proceed with the configuration steps for this software. Some of the information you need to provide is as follows:
- Server Name: Fill in Localhost, which is the name of the server, or you can understand it more simply as the domain name leading to your website.
- Administrator’s Email address: Enter the exact Email you own.
- Apache HTTP Port: Leave default 80. Continue clicking “Next” to move to the next installation step.
Configure MySQL
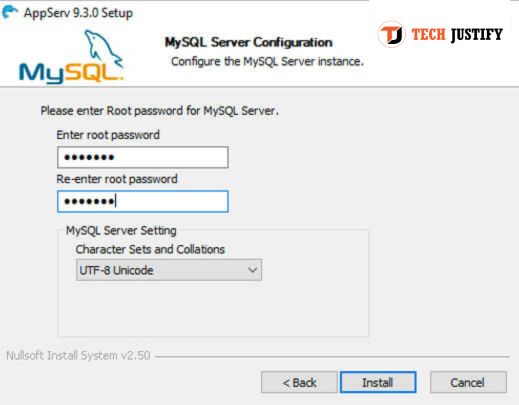
In the “MySQL Server Configuration” step, you need to enter the password in the box. In this step, you need to choose an easy-to-remember password because this is the password for the account to manage MySQL. The default user name will be root and the password will be chosen by you. After completing, you need to remember the information carefully for the next access. Click “Install” and proceed with the automatic installation step. After this process is complete, you select “Finish” and check the two boxes
“Start MySQL” and
“Start Apache” for the system to start.
AppServ Login
After completing the installation process, you can check again by opening the browser and accessing localhost. Then, you go to the path localhost/phpMyAdmin when logging in successfully, the system will transfer to the administration page. When you reach this step, you need to install the language by entering the Database name in the Collation section, select
utf8_unicode_ci then click
“Create” . After completing the above step, you proceed to select Privileges to add User to grant permissions. In this step, the system needs some basic information such as username, host, password… The section below will be the permission boxes for users to exploit the Database. If you create an account for the administrator, in this step, check all.
Notes when using and installing AppServ
After installing AppServ, users often encounter the following problems and need to fix them immediately to avoid affecting performance.
Port collision
This case will cause the AppServ installation process to not complete and users will not be able to access Localhost. The main reason for this situation is that the software uses port 80. You need to find out the application that is using it and exit the localhost that is taking over to avoid duplicate AppServ.
Turn off Windows operating system firewall
If you disable Windows firewall or anti-virus software, it will often block port 80. Other webserver applications sometimes cause similar problems. Therefore, you need to disable the firewall before installing to avoid being blocked.
Turn off UAC on Windows
Windows operating systems usually enable the User Account Control function by default. This will sometimes limit users to certain rights such as installing AppServ. Therefore, you should switch to the off state before installing this application. In general, all versions of Windows perform the shutdown operation quite similarly. You just need to select
“Start” on the Windows icon in the lower left corner of the screen and enter UAC. Next, select “
Change User Account Control Settings” then scroll down to “
Never Notify:” and you’re done. You can access AppServ at any time by simply logging in with the username and password set above. Once successfully installed, learn and confidently make the most of all the features of this tool. If you want to log out, just click the Log out button. The above article shares
what is AppServ and detailed instructions on how to install and use AppServ for beginners. Hopefully this will be useful information to help readers gain more knowledge to make the most of this tool.
Conclusion
AppServ is a comprehensive and easy-to-use solution for anyone needing to set up a local server environment quickly and efficiently. With just a few simple steps, you can start using tools like Apache, PHP, MySQL, and phpMyAdmin without the hassle of separate installations.
By following the detailed instructions above, even beginners can successfully install and operate AppServ on their personal computers. Hopefully, this guide has provided useful and practical knowledge to help you take full advantage of AppServ’s features. Good luck, and enjoy your journey into web development with this powerful tool!

Pradeep Sharma is a author the mind behind Techjustify, where I craft insightful blogs on technology, digital tools, gaming, AI, and beyond. With years of experience in digital marketing and a passion for tech innovation, I aim to simplify complex topics for readers worldwide.
My mission is to empower individuals with practical knowledge and up-to-date insights, helping them make informed decisions in the ever-evolving digital landscape.