How to Fix Cursor Not Moving on Windows 10 & 7 – (Fix Laptop / Computer Cursor Not Moving) When the cursor on a laptop or computer cannot move, it will certainly interfere with our activities. The reason is, this cursor is used to carry out commands to open programs or files on the laptop.
Indeed, we can operate a computer without a cursor, namely using a keyboard. But, you can imagine how troublesome it is when we have to press keyboard keys to perform commands
Well, if you are having problems with the cursor not moving, please read and practice the guidelines I provide in this article. As much as possible I present it briefly so that it is easy to understand.
Table of Contents
Is the Cursor Freeze Only?
Before proceeding to the main tutorial, it’s a good idea to try to reactivate the cursor on the laptop. The reason is, your laptop cursor may not have a problem but just turn it off (freeze).
To disable freeze mode on a laptop or laptop cursor, please press the FN + F7 or FN + F9 keys on the keyboard. If successful, the cursor can automatically be used as before.
If it still doesn’t work, then you have to do a few settings in Windows. Please read the guide below.
How to Fix Cursor Not Moving
To overcome the cursor that can not move, there are actually several ways that can be tried. However, this time I will only provide one guide that is the most powerful based on personal experience.
Since the cursor cannot be moved, you will need to use the keyboard to practice this method.
Here are some of the buttons used:
Arrow Keys : To swipe up, down, right, and left
Tab key : To move options
Enter key : To select an option (click / ok)
If so, it’s time to practice!
4 Ways to Fix Cursor Not Moving on Windows 10 & 7
How to Fix Cursor Not Moving via Control Panel

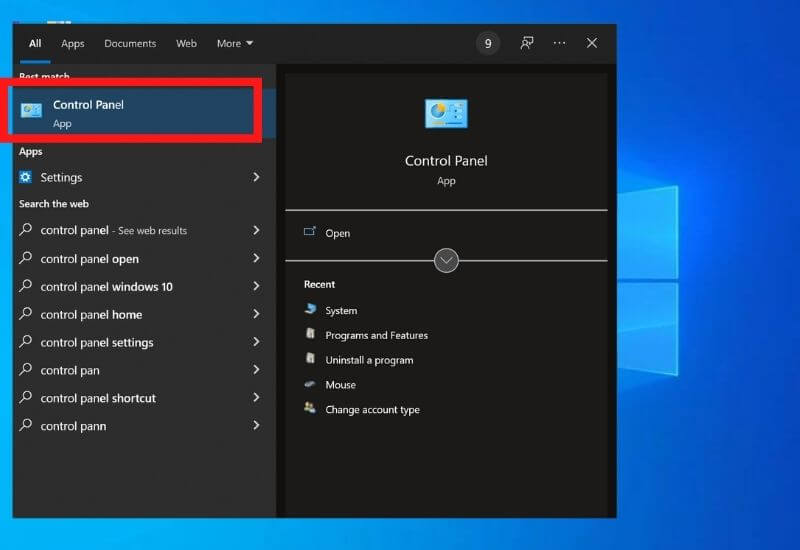
First, please open the Control Panel in Windows first. The trick, please press the Start button and then type Control Panel . If you find something like the image above, just press the Enter key .
How to Fix Cursor Not Moving Via Select Hardware and Sound

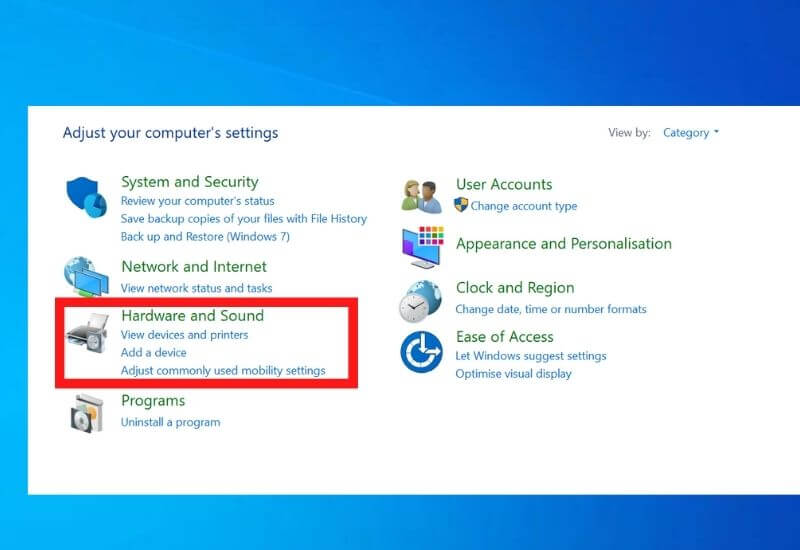
After the Control Panel opens, then select the Hardware and Sound menu . The trick, please press the Tab key on the keyboard until the dotted line in the form of a box is on Hardware and Sound . If so, press Enter to open.
At this stage, what you should pay attention to is the dotted box-shaped line. Make sure the mark is already on Hardware and Sound then press Enter to open the menu.
Read Also : 3 Easiest Ways to Use a Wireless Mouse Without USB Dongle
Select Menu Mouse

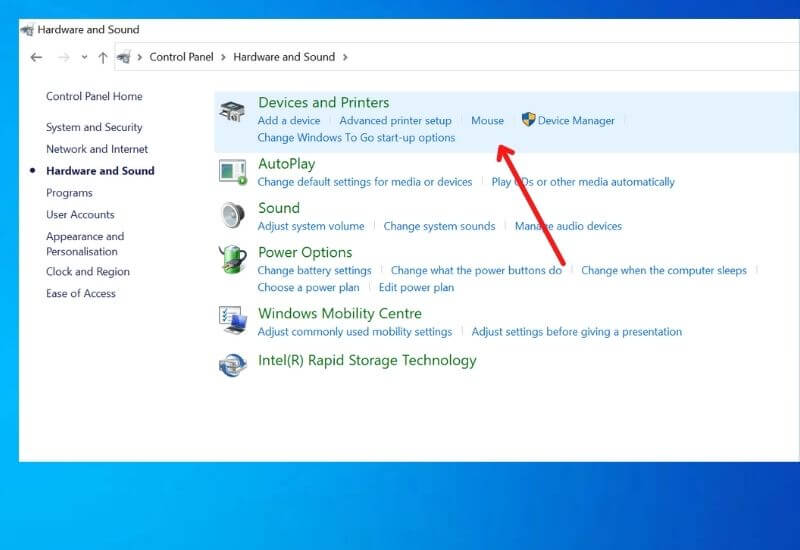
Arriving at Hardware and Sound, you must select Mouse to set the cursor on the laptop.
The method is the same as before, you just press the Tab key on the keyboard and open the Mouse menu by pressing Enter .
Enable Devices Settings

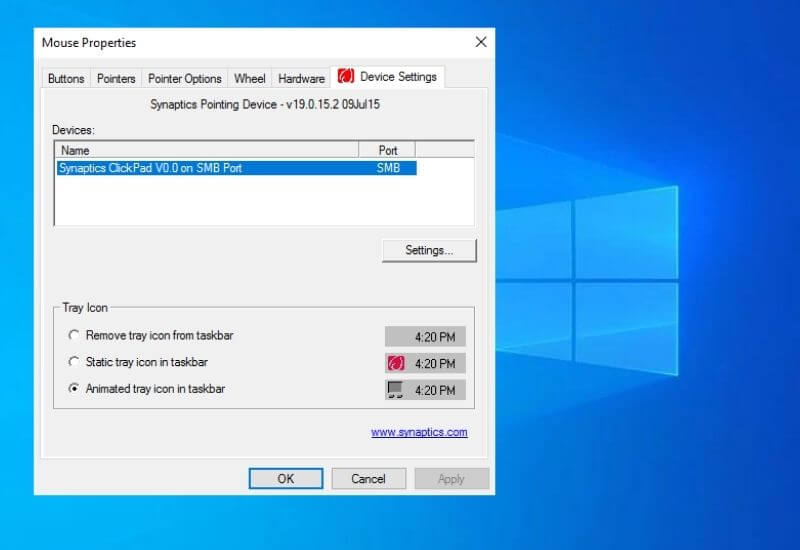
Once you see Mouse Properties open, it’s time to enable Synaptics TouchPad on the laptop. To do this, you must also use the Tab and Arrow keys on the keyboard.
So, after the dotted line is on the Buttons tab , please scroll to Devices Settings using the Right Arrow button . After that, press the Tab key and Enable Synaptics TouchPad.
If it has been activated successfully, save the settings by selecting Apply and then selecting OK as well.
Try Moving the Cursor
Now, please try to move the mouse whether the cursor on the laptop also moves. If so, then you have successfully reactivated the cursor on the laptop by enabling Synaptics Touchpad.
For your information, the method above tends to focus on laptop devices that have a touchpad.
If you are a computer user, then the important things you should check are the mouse and the USB port.
Simply put, please try moving the mouse to another USB port whether the cursor can move or not. In addition, also pay attention to whether the mouse light is on or not. If it doesn’t, it’s possible that the mouse is faulty.

Pradeep Sharma is a author the mind behind Techjustify, where I craft insightful blogs on technology, digital tools, gaming, AI, and beyond. With years of experience in digital marketing and a passion for tech innovation, I aim to simplify complex topics for readers worldwide.
My mission is to empower individuals with practical knowledge and up-to-date insights, helping them make informed decisions in the ever-evolving digital landscape.


![How to Overcome Pointer/Cursor Not Moving [Fix] - Techjustify](https://techjustify.com/wp-content/uploads/2022/03/How-to-Overcome-PointerCursor-Not-Moving-Fix-6.jpg)