
How to Setup Yandex Corporate Mail – If you use Yandex corporate mail, you can check your mail using the e-mail clients available on both mobile and desktop devices.
Companies and brands are generally in favor of using Yandex corporate mail, as there is unlimited mail opportunity.
You can easily perform operations such as deleting an e-mail, marking it as unread, or converting it to a file with Yandex corporate mail.
All you have to do is use IMAP and perform the recommended sync settings.
Table of Contents
How to Setup Yandex Corporate Mail
Ingredients
- Create a Yandex account
- Go to Yandex Connect page and log in
- Optionally send invitations
- Perform activation
- Login to the administration panel
- Enter the domains section
- Make the necessary settings in the Webmaster panel
- Perform domain verification
- Edit MX records
- Add emails
1. Create a Yandex account
If you want to take advantage of the corporate mail opportunity offered by Yandex, you must first create a Yandex account.
Yandex account will be like your window to the outside. With a Yandex account, you can enjoy unlimited Yandex features.
- Creating a Yandex account is a fairly easy task. All you have to do is go to https://yandex.com.
- Then you need to click on the Sign In button in the upper right corner.
- You will see two options as Login and Create Account, click on Create Account and create your account by following the necessary steps.
2. Go to Yandex Connect page and log in
Thanks to Yandex Connect, you can use features such as Email, Disk, and Wiki together. Thanks to these e-mails that will be linked to your domain name
You can create a corporate mail base. If you have a Yandex account, you can use the Yandex Connect service.
- Log in to your Yandex account and visit https://connect.yandex.com/ .
- Then you need to click on the Try it button in the upper right corner.
- Then, for the necessary authorization, you must write your company name and click the Signup button.
3. Optionally send invitations
You have two different options, such as authorizing employees in your company or inviting them later.
You should not forget that the second method is generally preferred during Yandex corporate mail setup. It will be much more accurate to make an edit after all the processes are completed.
- You can send invitations to company employees by typing their e-mail address in the blank section of the Invite Employees to the Institution window .
- You can plan to send invitations to users later by using the Invite Later button in the same window .
4. Perform activation
While continuing to make your Yandex Connect settings, your last step will be to connect the corporate services to perform the internal settings.
You can find all the services you need at your fingertips. After activation, Tracker and Mail for Enterprises will be enabled automatically.
- The last option will be the activation phase when making simple installation settings in Yandex Connect .
- In addition to Tracker and Mail for Institutions options, you will see a yellow Enable button, click this button to activate the necessary features.
5. Login to the administration panel
After making simple settings for Yandex Connect, you will see a large page with more than one service.
On this page, options such as Webmaster, Mail, Chats, Disk, Contacts, Tracker, Wiki, Forms, Calendar, and Admin Panel will appear.
- You should choose the Admin Panel l one of the services in Yandex Connect .
- The Admin Panel will direct you to a page that will help you manage your institution settings and data.
6. Enter the domains section
After entering the Administration panel in Yandex Connect, a page with the text All employees will appear.
Now you need to pay attention to the left menu in this section. There will be options such as Teams, Tariffs and services, Your Account balance, and Institution profile.
- On the page where All employees is written, you should proceed towards the Institution profile heading from the left menu .
- You need to click on the Domain names submenu here .
7. Make the necessary settings in the Webmaster panel
If you have followed the steps above, you should now be in the Webmaster panel. What you need to do here is to add a domain name.

So you will be able to find out how hard or easy your site is to find. You will also be able to perform settings such as Yandex corporate mail.
- While on the Webmaster panel, click the yellow Add domain button.
- A window will appear with the phrase New domain name . In this window, you need to write your domain name address in the blank.
8. Perform domain verification
Once you’ve added your domain name, you can’t just leave it and wait for it to be verified. All you need to do is make a change to your site’s DNS records, WHOIS records, meta tag, or HTML file for the necessary validation and complete the validation process.
- Verify your site using the DNS, HTML file, WHOIS and Meta tag options located just below the domain name verification subheading .
- The preferred method will usually be the Meta tag . You need to take the meta tag and place it in the <head> section of your site.
- If you are using WordPress, you can get support from Yoast SEO or Jetpack plugins for this.
9. Edit MX records
One of the most important steps in setting up Yandex corporate mail is definitely MX records. MX records need to be edited to suit Yandex. Yandex will help you with this.
- It’s a bit of a tricky thing to do after you’ve done the adding and validating domain name.
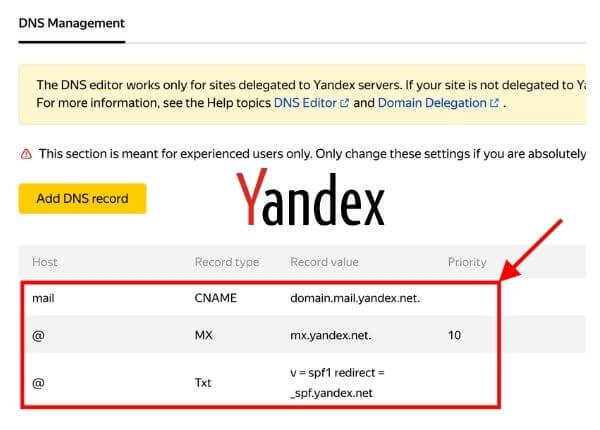
- What you need to do is to add the records that Yandex offers under the name of DNS management to the domain name or hosting panel.
- Open the cPanel where your site is installed and enter the Zone Editor section under the Domains menu .
- In the window that opens, click the Manage button opposite the relevant domain name.
- Now press the + Add Record button and select the MX one from the type section. Type 10 in the priority section and enter the phrase mx.yandex.net in the target location section . Finally, click the Add Record button on the right.
- Now press the + Add Record button again and choose TXT from the type section. Add v=spf1 redirect=_spf.yandex.net to the registration section . Finally, click the Add Record button on the right
If you wish, you can get support from your hosting provider in this regard. If you want to do it yourself, you can follow the steps above.
After editing the MX records, everything will be partially available. Therefore, you must proceed to the next step to complete the transactions.
10. Add emails
After following the steps above, you should see MX record verified in the domain name section of your Yandex Connect panel. After seeing this verification, you can now start entering email addresses into the domain.
- Log in to your Yandex Connect account and choose Administration from among the services.
- After entering the management section, click on the place that says All employees from the left menu.
- A new employee window will appear. Fill in the information completely here.
Everything is ready now. You have successfully created Yandex corporate mail. The processes may seem a bit too much
But because we try to explain each step in detail, it may seem like a lot. Now all you have to do is to follow your Yandex corporate e-mail addresses through an e-mail client.
We are always open to your problems, questions, and suggestions, so feel free to Comment on us by filling this. This is a free service that we offer, We read every message we receive.
Tell those we helped by sharing our posts with friends or just liking to Follow us on Instagram, Twitter and join our Facebook Page or contact us on Gmail, Linkedin, etc

Pradeep Sharma is a author the mind behind Techjustify, where I craft insightful blogs on technology, digital tools, gaming, AI, and beyond. With years of experience in digital marketing and a passion for tech innovation, I aim to simplify complex topics for readers worldwide.
My mission is to empower individuals with practical knowledge and up-to-date insights, helping them make informed decisions in the ever-evolving digital landscape.