Turn Off Windows Update – Basically the update settings in Windows 11 are very useful. With the update, we will get many new features along with increased security.
Unfortunately, the updates that Microsoft provides are sometimes very large in size. For some people who don’t use WIFI or cable internet, of course it will drain their data quota.
If you are one of the people who use Windows 11 and are not connected to WIFI or cable internet, here you can turn off Windows 11 updates.
Table of Contents
How to Stop Windows 11 Update in 2024
There are several ways that you can use to disable the update function in Windows 11. You can use any method, according to your needs.
And a little extra, also make sure that your Windows 11 is already active. Please read how to activate Windows 11 . How to Turn Off Windows 11 Update
5 Ways to Turn Off Windows Update Permanently
- 1. Via Regedit
- 2. Via Windows Service
- 3. Via Pause Update
- 4. Via Command Prompt
- 5. Using Apps
1. Turn Off Windows Update Via Regedit
The first way is through the Registry Editor, or so-called Regedit . Through Regedit we can disable updates in Windows 11 forcibly.
Here’s how to turn off Windows 11 updates via Regedit:
- First, in the Windows search field, please type Regedit . Then you open the application.
- After Regedit opens, please go to HKEY_LOCAL_MACHINE > SOFTWARE > Policies > Microsoft > Windows.
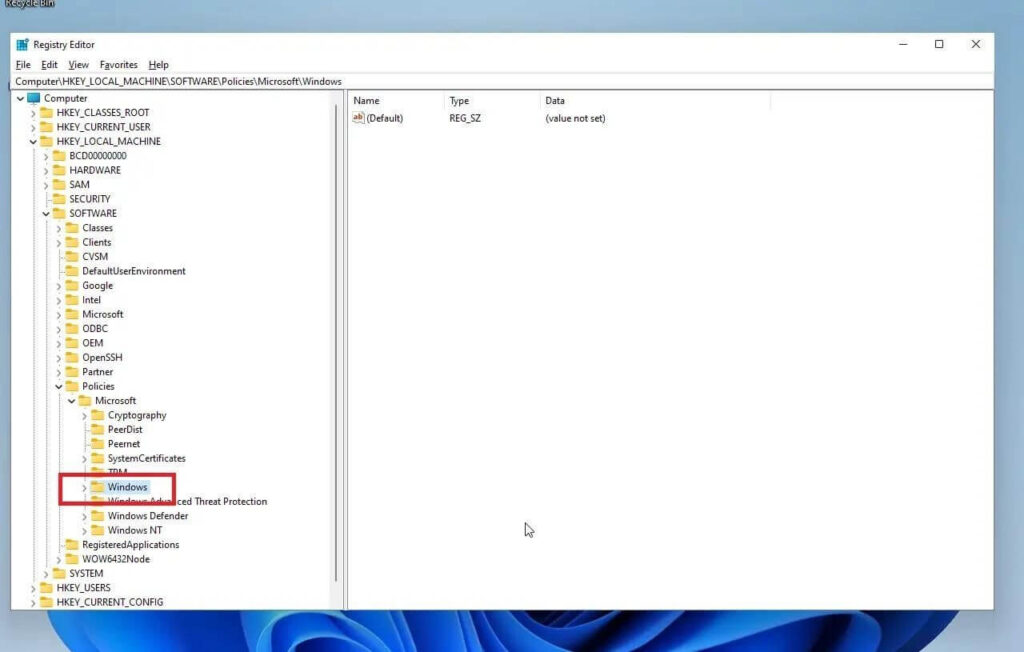
- Then you right-click the Windows folder. Then select New > Key and fill in the name to WindowsUpdate .
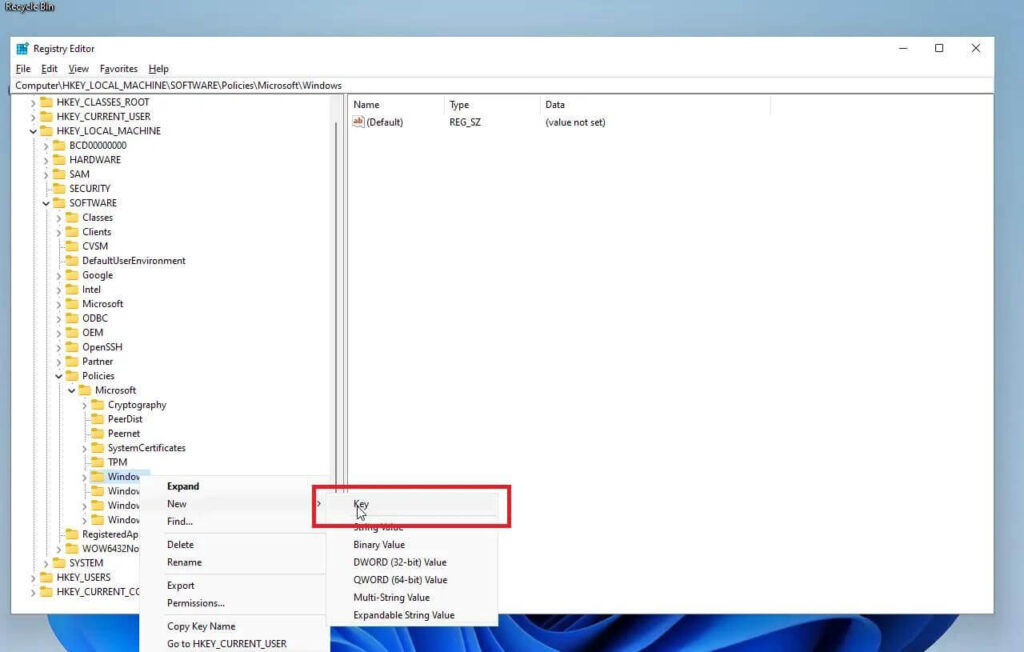
- Then the Windows Update folder will appear. Here you right-click the WindowsUpdate folder > Select Key > Then fill in the name AU .
- In the right column of the AU folder, please right click > Then select New > DWORD (32-bit) value . Name it NoAutoUpdate .
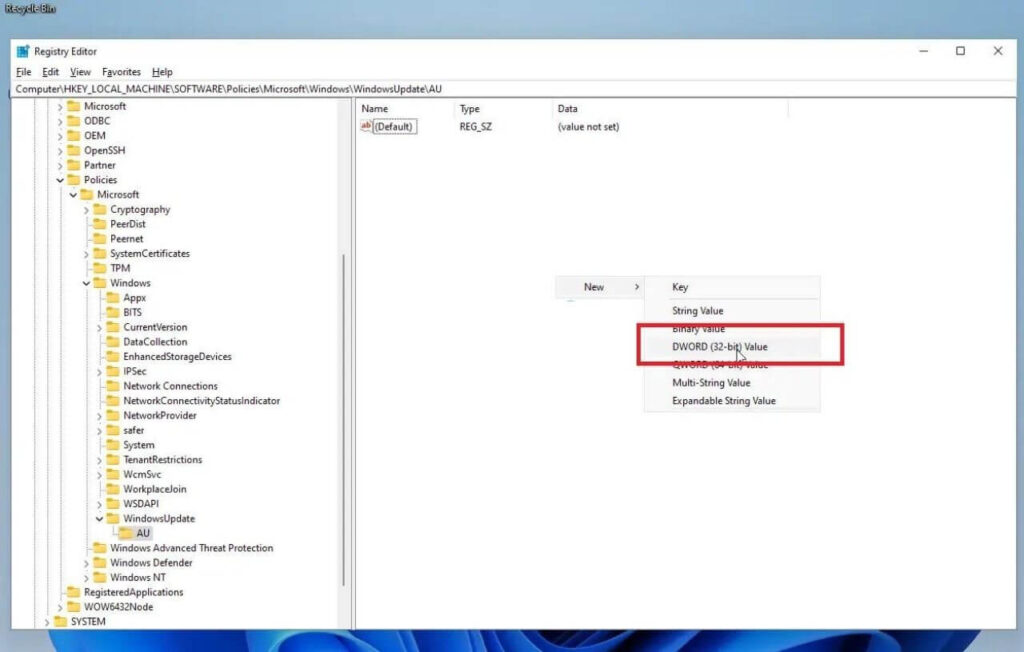
- Right-click on NoAutoUpdate > Then you select Hexadecimal and fill in the value to number 1.
- Restart your PC. So with this Windows 11 update function will turn off.
2. Turn Off Windows Update Via Windows Service
Windows update is a feature that runs since the new computer or laptop is turned on. Here you can turn off the function via Windows Service.
By turning off the update function, your computer or laptop will no longer be connected to the Windows Update server, until you turn it on again.
Here’s how to turn off Windows Update via Windows Service:
- First you type Services.msc in the Windows start menu search field:
- Wait until the services window opens. If you have, you swipe down, look for the Windows Update option.
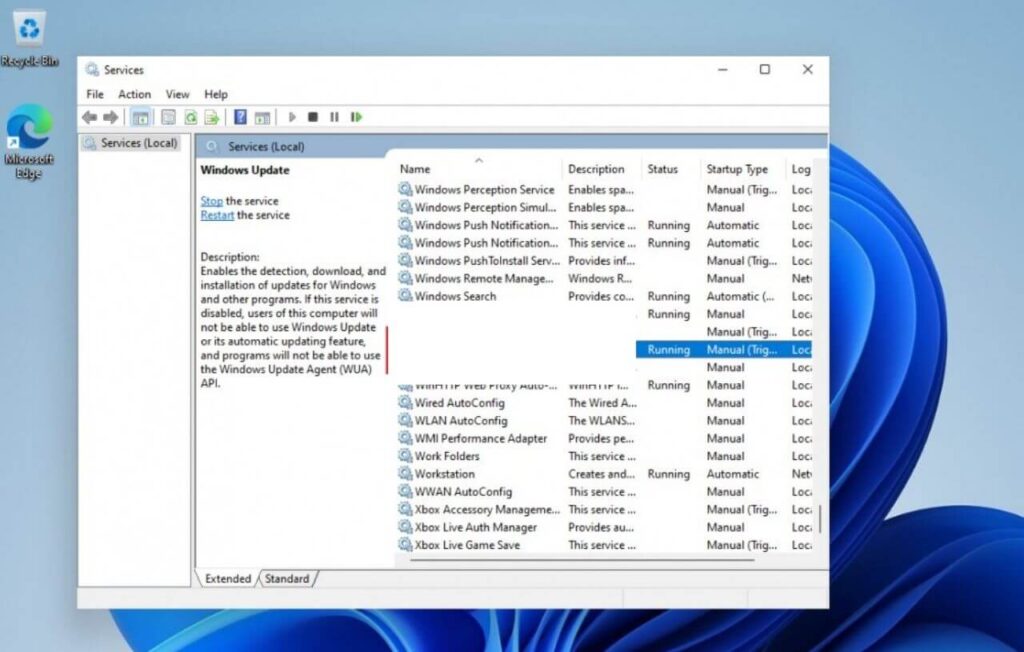
- Please right-click Windows Update services > Then select the Stop option .
- Double-click on Windows Update services > Set the Startup Type to Disabled > Then you click OK .
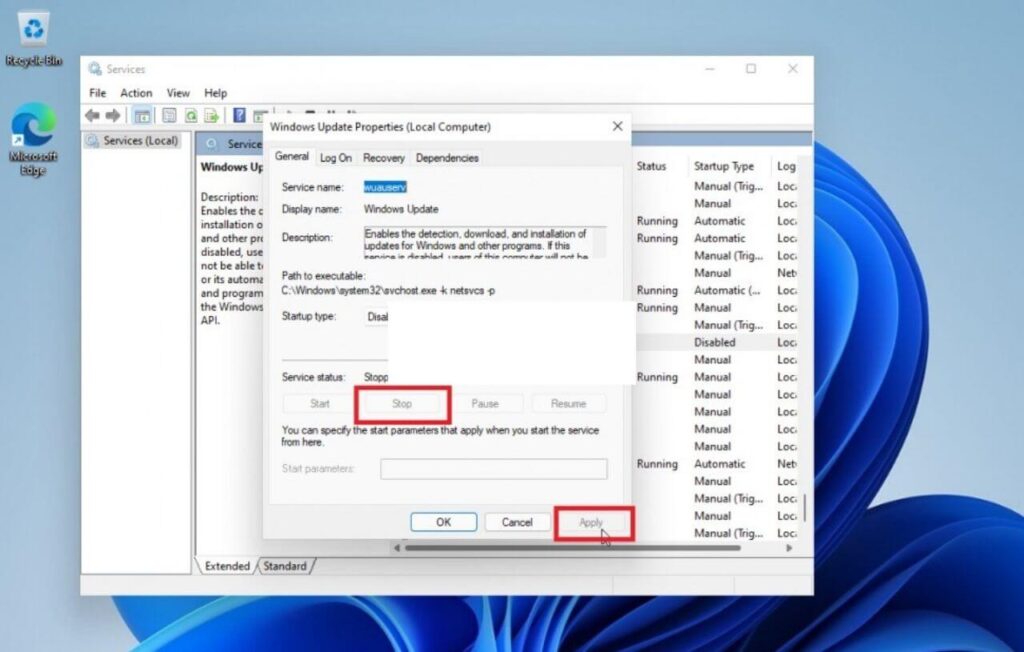
- Finished. Then the update function in your Windows 11 will be disabled.
3. Turn Off Windows Update Via Pause Update
The pause option does not immediately turn off the update function in your Windows 11. Instead, it will delay the update to the date or time you want.
The advantage is that you can plan the update time this way. For example, when you have an unlimited internet connection.
Here’s how to disable Windows 11 updates via pause update:
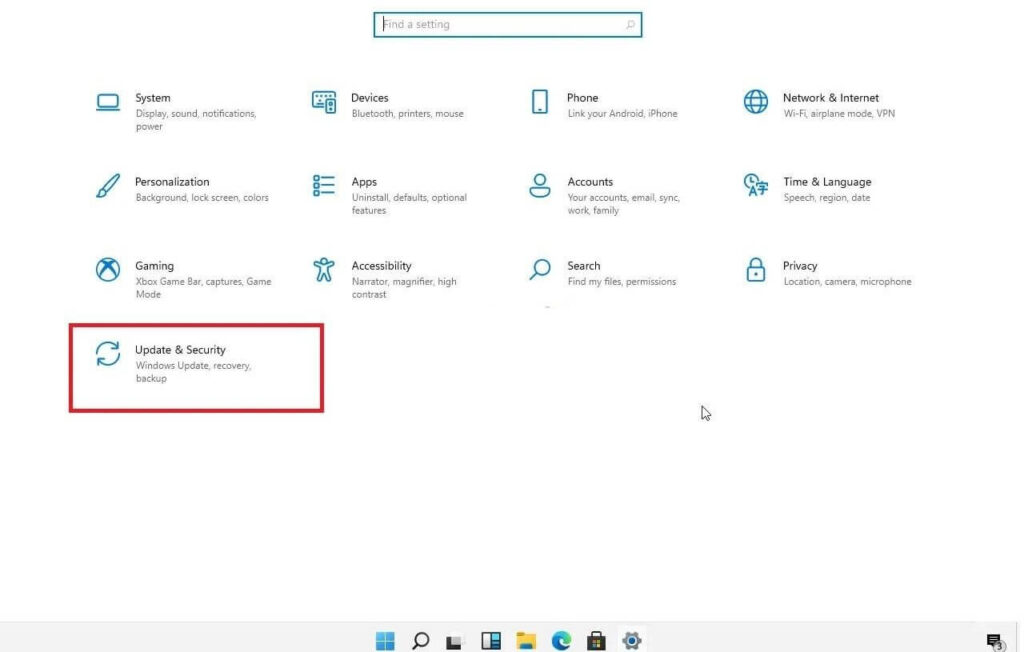
- First, please type Settings in the Windows search field. Then open.
- After Windows Settings opens, you enter the Update & Security menu column .
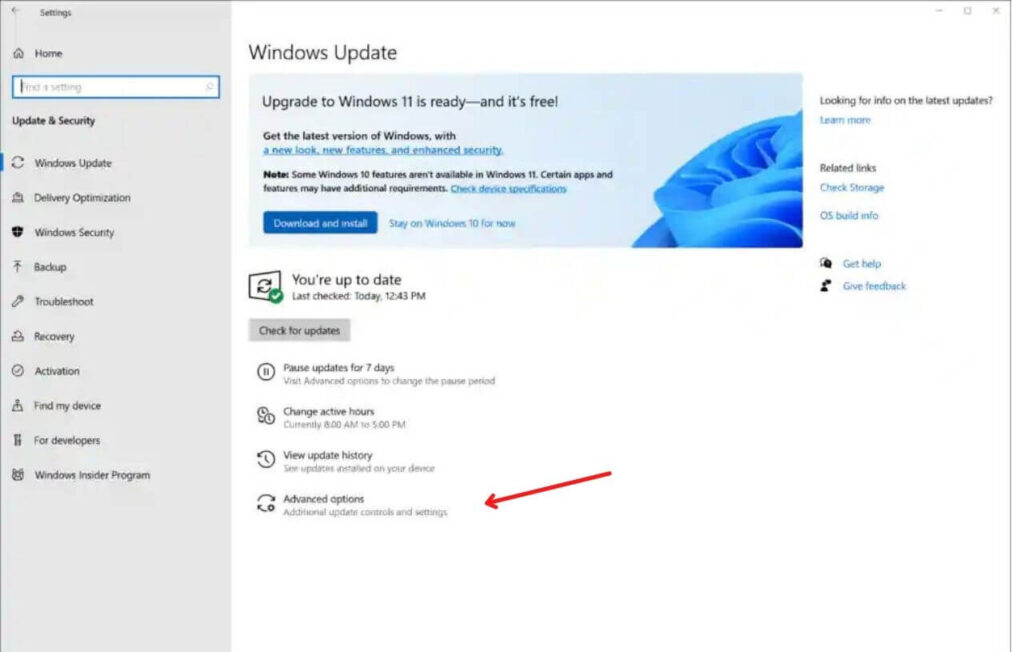
- Click the Advanced Options option on the Windows Update page.
- Scroll down, open the Pause Until column then you set the date until when Windows Update is stopped.
- Finished. Your Windows 11 will disable the update function until the date you specify.
4. Turn Off Windows Update Via Command Prompt / CMD
Command Prompt in Windows 11 has the same function as previous versions of Windows. Even in Windows 11 the commands provided are more complete.
In the Command Prompt, you can turn off Windows 11 updates easily. If you want to know how, please follow these steps:
- First, you open the Windows 11 search field > Type Command Prompt or CMD then open it by right clicking > Select Run as Admin .
- Next you type the command net stop wuauserv > net stop bits > net stop dosvc gradually while pressing the Enter key.
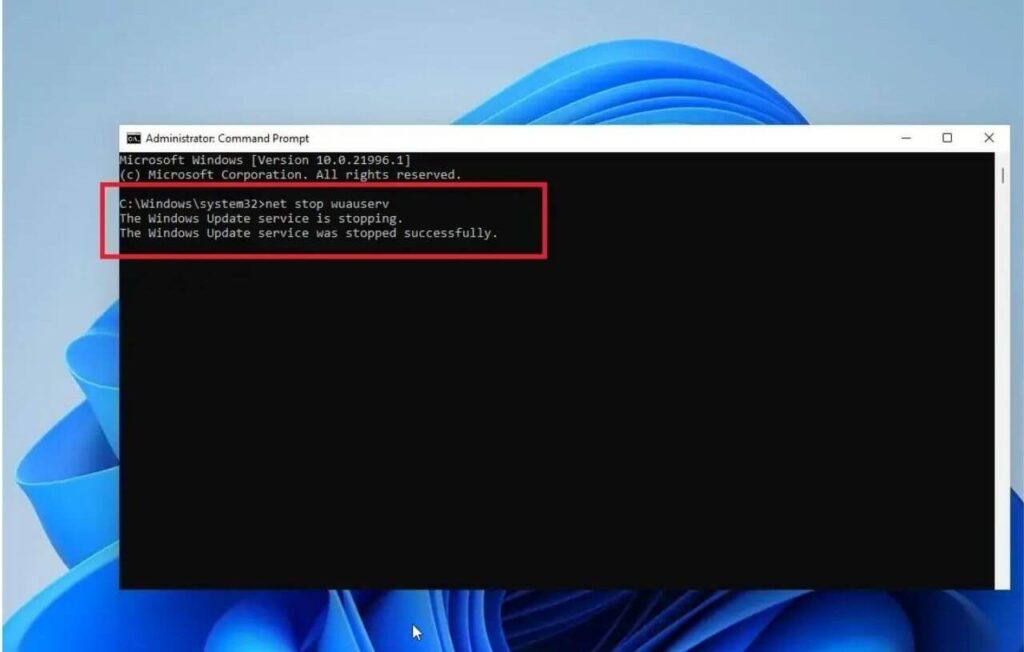
- Then you will see a Successfully stop message on every command line you enter. If everything is done, Windows update on your Windows 11 has been disabled now.
If you want to reactivate the update, you can repeat the steps above, then change the word stop to start .
- net start wuauserv
- net start bits
- net start dosvc
Especially for this CMD point, you can also do it through Windows 11 safe mode
5. Turning Off Windows 11 Update With Applications
Finally, you can turn off updates in Windows 11, using the Win Update Stop application. This application serves to disable the Windows Update function by force, but in a simple way.
You just need to press the Stop Update option . Then your Windows Update function will automatically stop. This application is relatively small in size (about 40 – 50MB). For those of you who don’t want to be complicated, it never hurts to try it.
Here’s how to turn off Windows Update with the app:
- First you first install the Win Update Stop application via the official website . Just choose the Standard option , that’s enough.
- If you have, you open the Win Update Stop application > Click the Disable button .
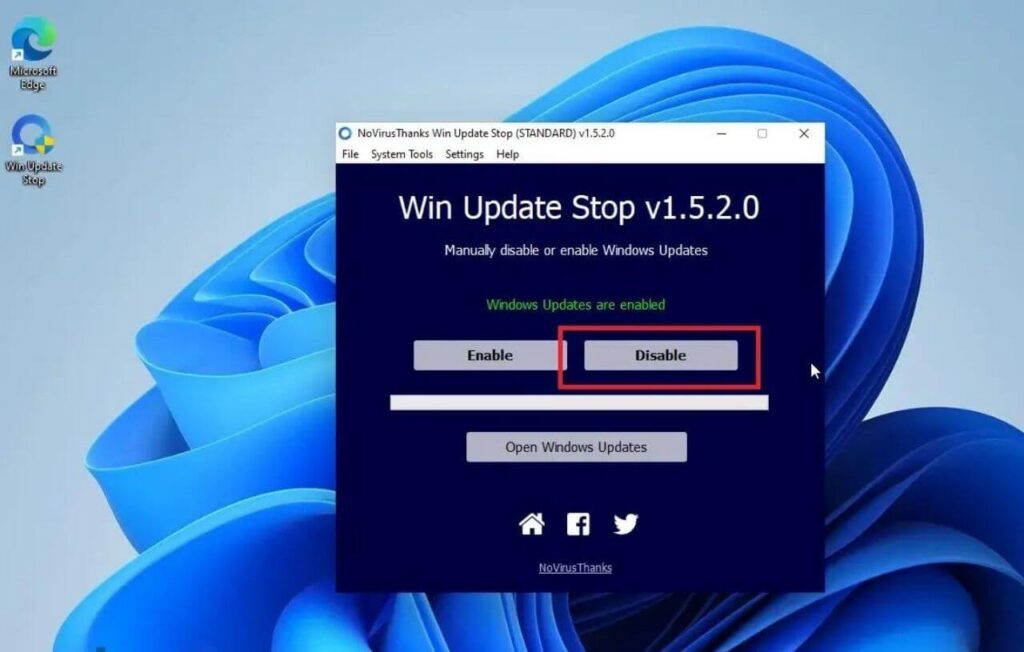
- Wait for the process for a few moments. If the message Windows Updates are Disabled appears , it means that the update function in your Windows 11 has been disabled.
Those are the ways that you can do to disable the update function in Windows 11. You can choose the steps you want, depending on your needs.
This method applies to all versions of Windows 11. In addition, this method also applies to Windows 11 that was upgraded from the previous Windows version, as well as those of you who installed Windows 11 directly.
Hopefully, you are like these Windows 11: 5 Ways to Turn Off Windows Update Permanently and we are always open to your problems, questions, and suggestions, so feel free to Comment on us by filling this.
This is a free service that we offer, We read every message we receive. Tell those we helped by sharing our posts with friends

Pradeep Sharma is a author the mind behind Techjustify, where I craft insightful blogs on technology, digital tools, gaming, AI, and beyond. With years of experience in digital marketing and a passion for tech innovation, I aim to simplify complex topics for readers worldwide.
My mission is to empower individuals with practical knowledge and up-to-date insights, helping them make informed decisions in the ever-evolving digital landscape.


