In the world of computer management, maintaining your storage devices is paramount. Managing your hard drives efficiently and troubleshooting issues swiftly can save you from major headaches. However, not all users are a pro of computer. You may be a beginner at manually partitioning a targeted device or a user with a half-baked idea for getting everything in the disk management Windows 10/11.
Thus, in this guide, we will delve into the wonders of Windows Disk Management, explore how to use it, and even introduce an excellent tool to enhance your disk management experience.
Table of Contents
What is Windows Disk Management?
First, let’s learn more about Windows Disk Management. Disk Management in Windows is a built-in utility that enables you to manage your hard drives and partitions without the need for third-party software. It provides a user-friendly interface for tasks like creating, formatting, resizing, and deleting partitions on your disks.
There are many basic management of computer can be perfectly performed by Disk Management:
Disk setting managements:
Disk initialization
Partition style conversion
Drive letter assignment
Dynamic to Basic disk conversion
Virtual disk management
Disk property inspection
Basic volume management
Simple volume creation
Volume size management
Setting a partition as active
Pros and Cons of Windows built-in Disk Management
★ Pros:
Free of charge: Disk Management comes at no cost and offers fundamental partition management capabilities, eliminating the need to resort to third-party software that often claims to be free but ultimately requires a paid upgrade.
✘ Cons:
Complex sizing requirements: Adjusting volume sizes, particularly when extending or shrinking, necessitates working with disk size in megabytes, which can be challenging for novices.
Occasional unexpected errors: Users may encounter unexpected errors, such as the “extend volume” option appearing greyed out or issues with hard drives not being recognized.
How to open Disk Management on Windows PCs
Accessing Disk Management is a breeze in Windows. Here’s how you can open it:
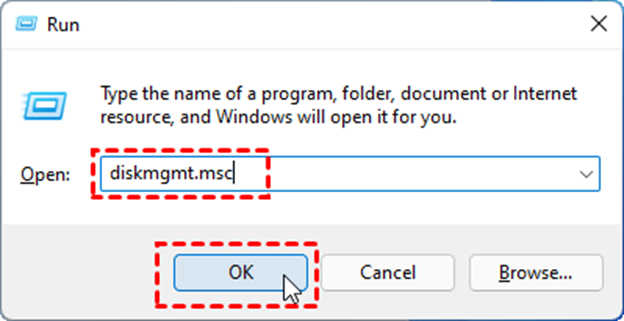
1. Using the Run Command:
Press Windows + R to open the Run dialog.
Type diskmgmt.msc and hit Enter.
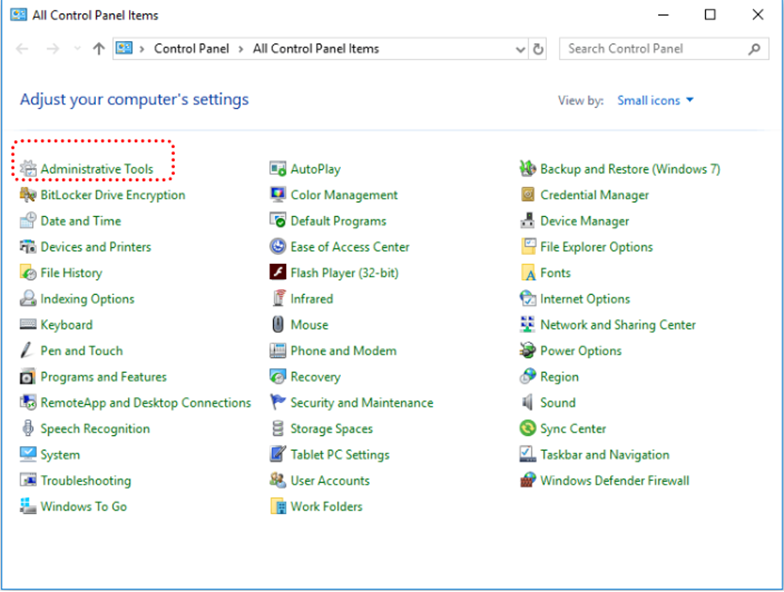
2. Via Control Panel:
Open the Control Panel.
Go to the “Administrative Tools” section and click on “Create and format hard disk partitions.”
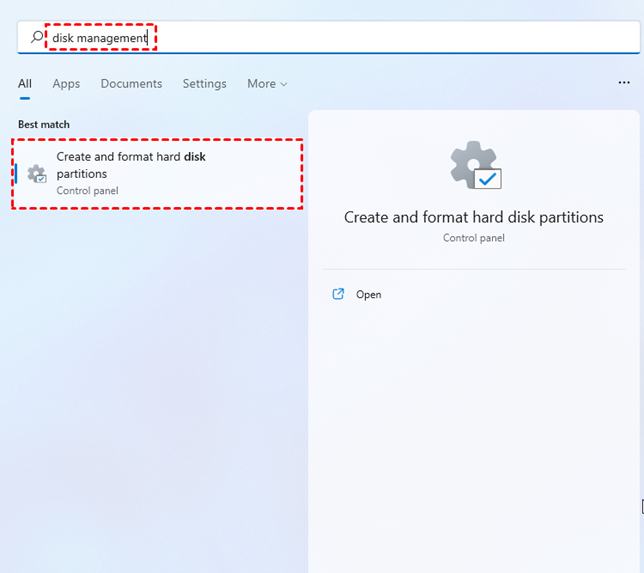
3. Using Windows Search:
Simply type “Disk Management” in the Windows search bar, and click on the result.
Now that you know how to open Disk Management let’s move on to using it effectively.
How to use Windows Disk Management to set up a hard drive
Enhancing the longevity of your hard drive is a common practice, given the intricate yet susceptible nature of these devices, which are susceptible to viruses and wear over time. One effective method to prolong their lifespan involves configuring your hard drive, effectively overseeing disk and partition space, and utilizing any available unallocated free space.
1. Resizing or extending a Partition
Step 1. In Disk Management, right-click on the partition you want to resize.
Step 2. Choose “Extend Volume” or “Shrink Volume” based on your needs. Follow the prompts to complete the process.

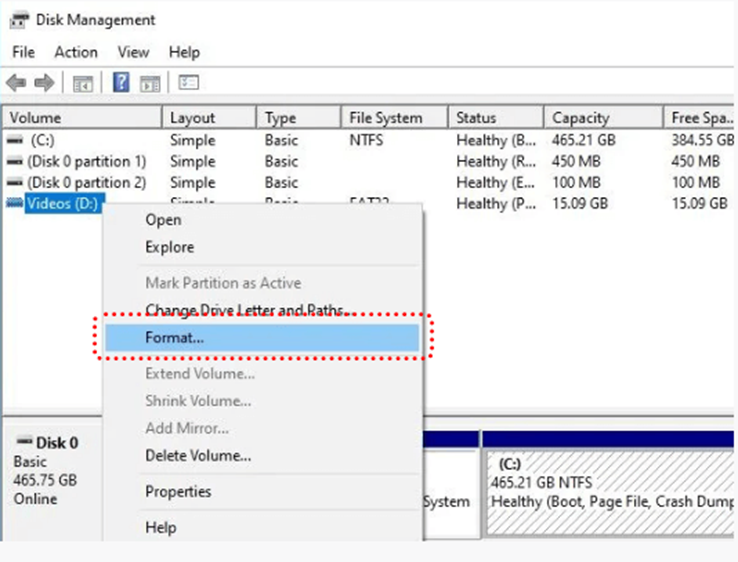
2. Formatting a drive
Step 1. In Disk Management, right-click on the drive you want to format. Select “Format.”
Step 2. Choose the file system, allocation unit size, and volume label.
Step 3. Click “OK” to format the drive.
Common Troubleshooting of Disk Management
Even though Disk Management is a handy tool, you might encounter some issues along the way. Here are some common errors and how to tackle them:
Virtual Disk Service error: Restart the Virtual Disk service from the Services application in Windows.
Windows extend volume greyed out: You may need to shrink or delete another partition to extend drive space.
Access Denied: Ensure you have the necessary permissions to perform the action.
Drive is not accessible: Check if the drive is properly connected or if it’s failing.
Ultra Disk Management Software for Windows
We understand that manual hard drive management through Disk Management is possible. Nevertheless, as mentioned earlier, it can lead to time-consuming errors. Why not explore an alternative, no-cost program that can complete tasks in a matter of seconds? Now, let’s turn our attention to an ultra disk management solution that can make your life even easier.
Your ultimate Windows disk management companion– AOMEI Partition Assistant Professional is a feature-packed disk management software that takes your Windows experience to a whole new level. With its intuitive interface and a wide range of tools, this software is perfect for both beginners and experienced users.
Why Choose AOMEI Partition Assistant Professional? Because this tool can give your computer and disks comprehensive services:
Seamless partition operations: It allows you to effortlessly create, resize, format, and delete partitions without limitations.
Data migration: Clone a hard drive to another hard drive, or copy OS from one drive to another without the hassle.
Dynamic disk management: It supports dynamic disk operations, making it easier to manage dynamic volumes.
Safe MBR & GPT conversion: No matter system disk or data disks, you can easily convert it without any data loss.
Secure your data: AOMEI ensures data safety by offering features like partition alignment and partition recovery.
Bootable media creator: Create bootable CDs/DVDs or USB drives for system maintenance.
Now, let’s walk through the process of extending your C drive and GPT conversion using AOMEI Partition Assistant Professional.
Extend C drive space
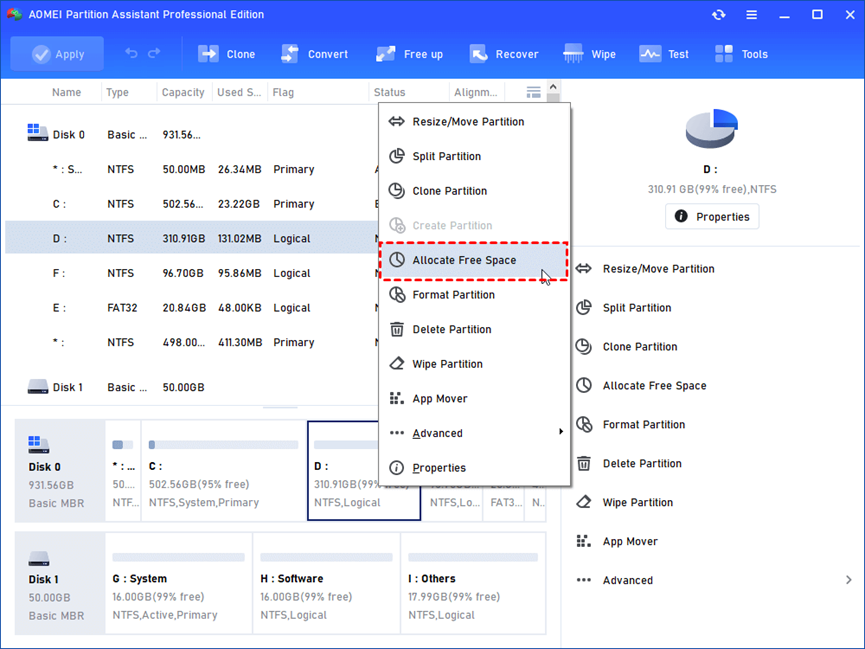
Step 1. Install and open AOMEI Partition Assistant professional. Right-click the D drive and choose “Allocate Free Space”.
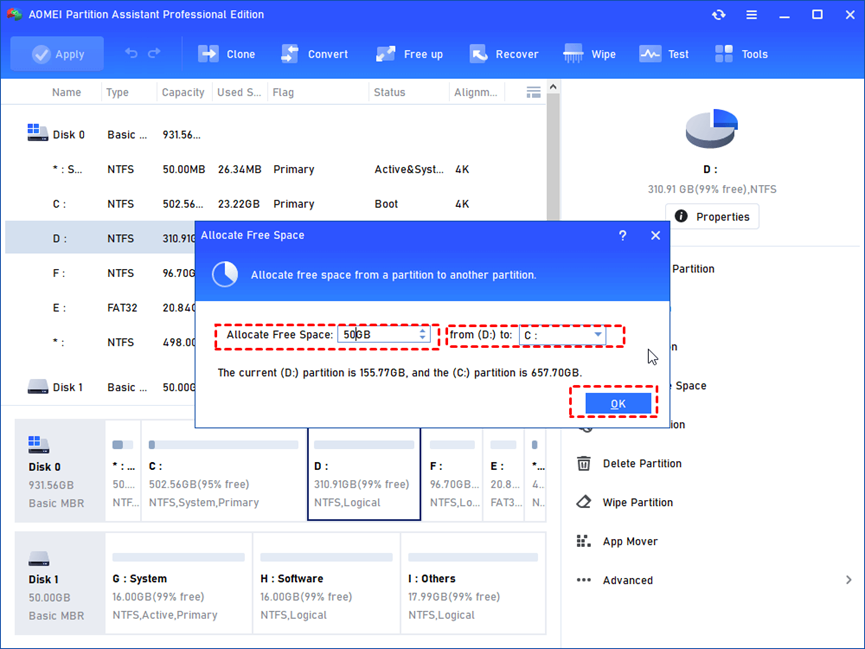
Step 2. In the new window, you can specify the space size and target partition. If it’s C drive, you need to select C drive from the given list, and click “OK”.
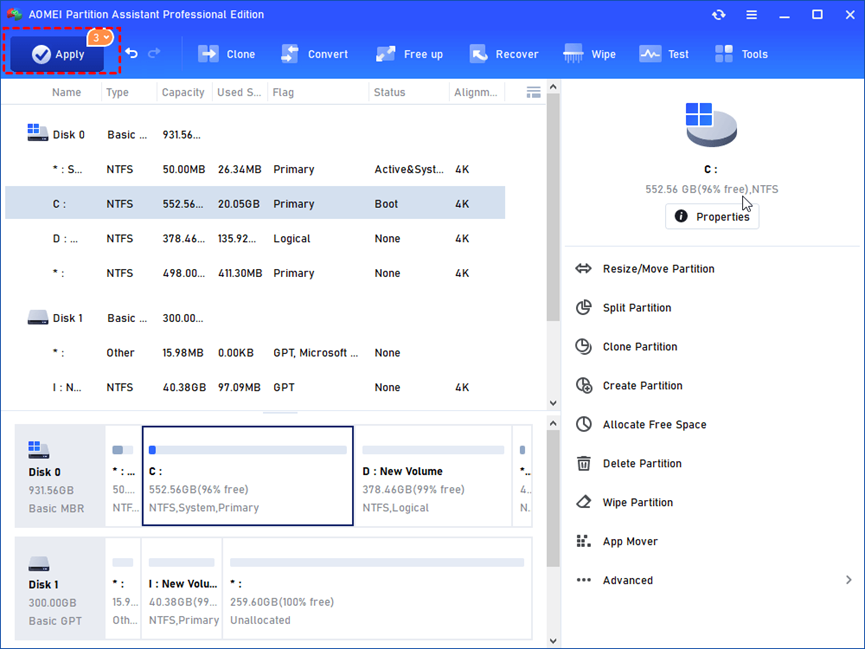
Step 3. Now, you can preview that the C drive has been extended. Then, click Apply to save the changes.
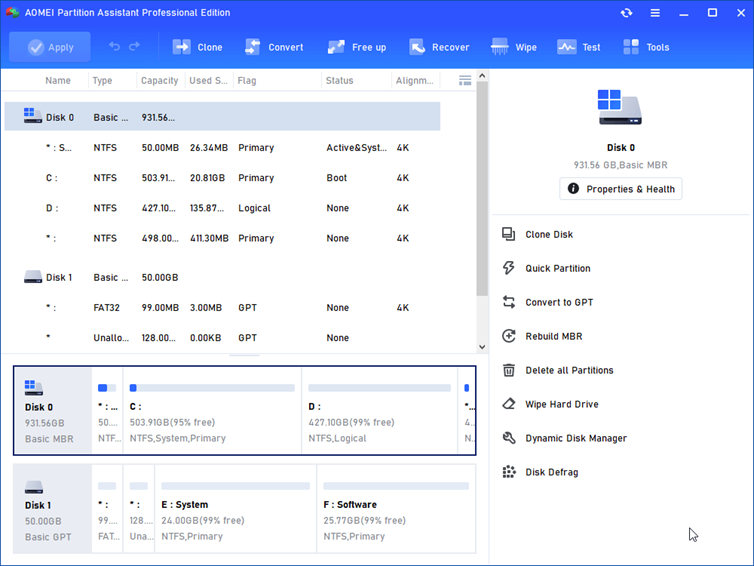
Convert MBR to GPT disk without data loss
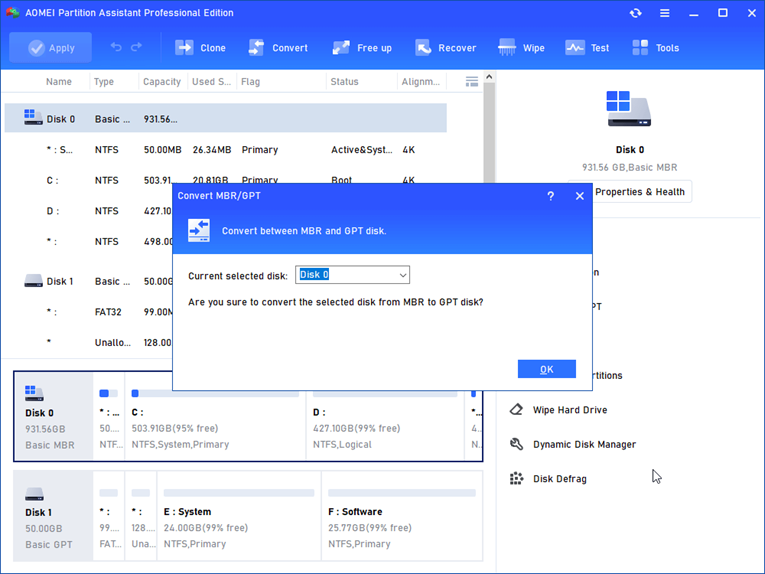
Step 1. Install and launch the AOMEI Partition Assistant Professional. After opening it, select the target disk and then click “Convert” at the top toolbar. Select the “Convert MBR/GPT” option.
Step 2. Ensure you have converted Legacy BIOS to UEFI, and click “Yes” to confirm.
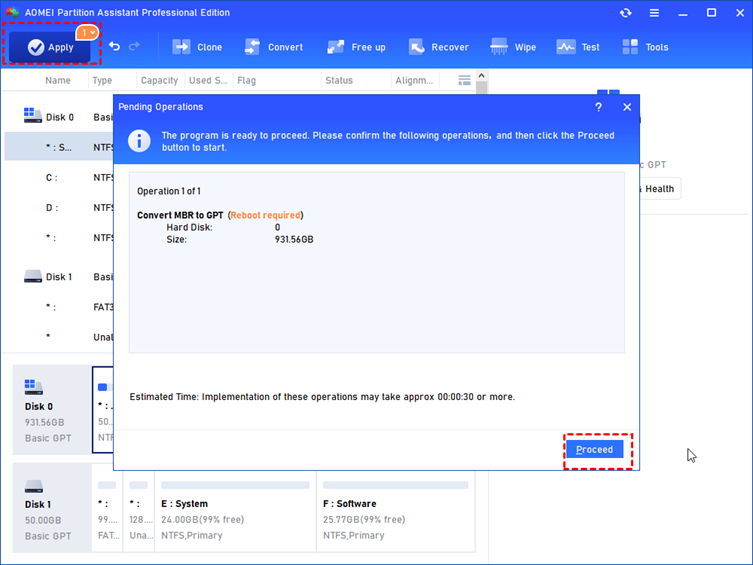
Step 3. In the main interface of AOMEI Partition Assistant, click “Apply” to start the conversion.
That’s it! AOMEI Partition Assistant Professional makes it remarkably simple to extend your C drive, giving you more space for your important files and applications.
Ending
In conclusion, Windows Disk Management is a valuable built-in tool for managing your hard drives and partitions. It’s user-friendly and can handle various tasks. However, for a more advanced and feature-rich experience, AOMEI Partition Assistant Professional stands out as an exceptional choice, providing you with comprehensive control over your disk management needs. Give it a try and see the difference for yourself.

Pradeep Sharma is a author the mind behind Techjustify, where I craft insightful blogs on technology, digital tools, gaming, AI, and beyond. With years of experience in digital marketing and a passion for tech innovation, I aim to simplify complex topics for readers worldwide.
My mission is to empower individuals with practical knowledge and up-to-date insights, helping them make informed decisions in the ever-evolving digital landscape.