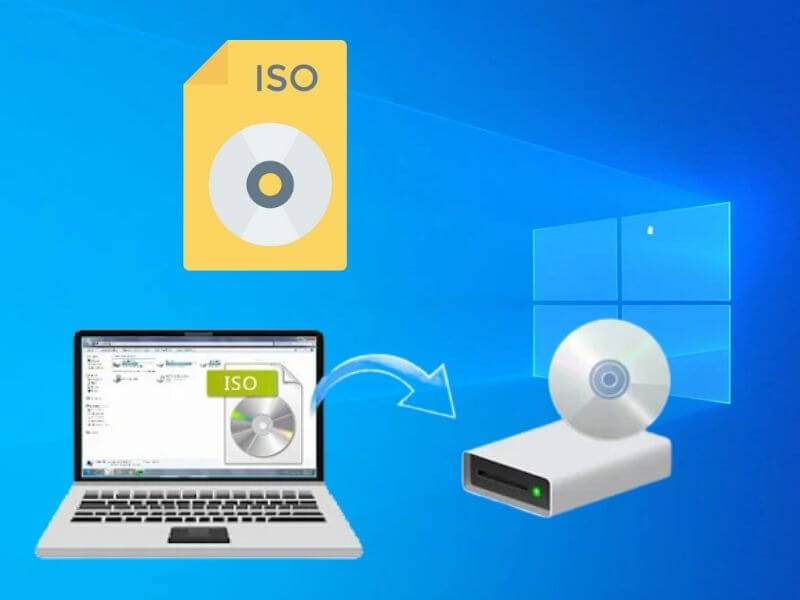
6 Ways to Mount ISO Files In Windows 7 ith/Without Applications – ISO is a file type that is often found in installer data. Like the operating system or software or games.
This ISO file serves to unify all the data in the installer. Then also to run the installer file.
If you want to run an ISO file, you don’t need to insert / burn the ISO file to a CD or DVD.
You just need to mount it. The method is as described in this article.
Table of Contents
How to Mount ISO Files Easily
There are several ways you can do to open (mount) ISO files. Starting from using software to without additional applications.
Here Uplotify will explain it to you. You just have to choose which method you want to use through the table of contents below:How to Mount ISO Files
- Without Software
- Power ISO
- Daemon Tools
- Winrar
- Windows PowerShell
- Ultra ISO
1. Mount ISO Files on Windows Without Software
For those of you who want to mount the ISO file but don’t want to install additional applications, you can use Windows features only.
But here make sure you are using at least Windows 8 or Windows 10. Because for versions of Windows 7 and below, this mount feature is not yet available.
Here’s how:
- Please open File Explorer , then find the ISO file you want to mount.
- If you have found it, please click it and select the Manage tab .
- Then select Mount .
- Wait a few moments until the mount process is successful.
- After success, you will be directly directed to the optical drive of the ISO file.
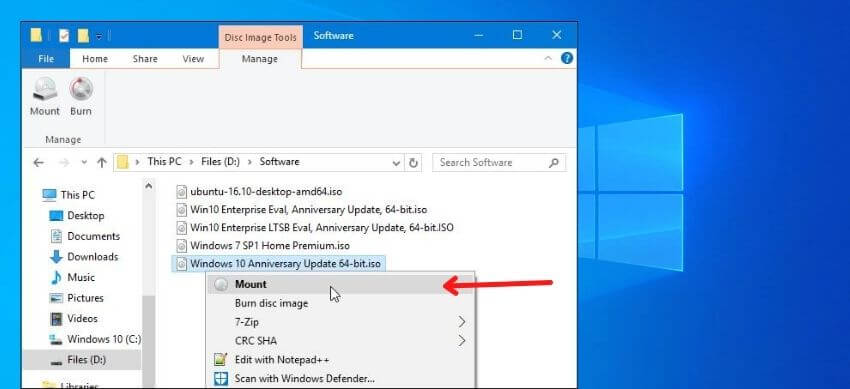
- Finished.
To unmount, you just have to right-click the drive that appears from the ISO file mount process. Then press Eject, automatically the drive and the ISO file will be unmounted.
2. Mount ISO Files on Windows Power ISO
If you want to use an application, you can use Power ISO. As the name implies, Power ISO is a special application for managing ISO files.
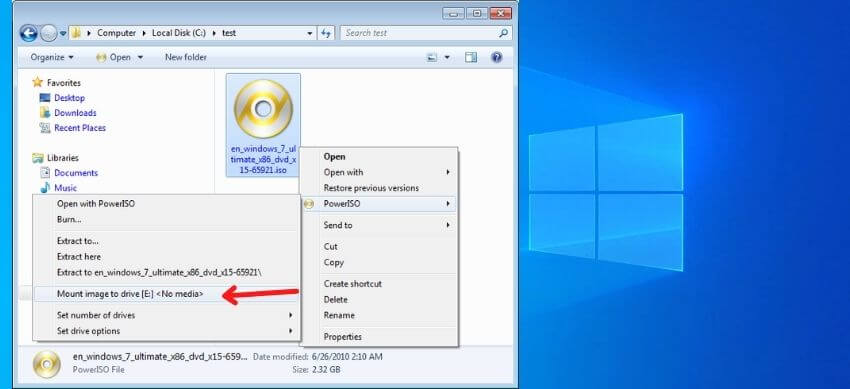
In this application you will later get several features, such as mount, burn to DVD or CD , create ISO files and many others.
Here’s how to mount with Power ISO:
- First, if you don’t have it, please download the Power ISO application through the official website first.
- Then install the Power ISO application on the computer.
- If you have, the Power ISO application will open automatically.
- Once open, please click Add files and folders .
- Then select the ISO file you want to open and select Add .
- Press the Mount tab, press Set number of drives and select the desired number of drives. Here we only choose 1 drive to be an optical drive.
- Press the Mount tab again and select the Mount image to drive option .
- If successful, the ISO file will appear in File Explorer as an optical drive.
- Finished.
When mounting on PowerISO, you can only unmount it through this app as well. Because the optical drive mounted via this application cannot be ejected as usual.
3. Mount ISO Files on Windows with Daemon Tools
In addition to Power ISO, you can also use the Daemon Tools application. For those who don’t know, Daemon Tools is an application that functions to mount ISO files.
In this application there is a virtual drive feature that functions to detect DVD, CD and BD ISO automatically.
Here’s how to mount an ISO file with Daemon Tools:
- Please download the Daemon Tools application first.
- If so, install the Daemon Tools application.
- Run the Daemon Tools application on the computer.
- After that, press the Quick Mount menu .
- Find the ISO file you want to mount and press Open .
- Wait for the mounting process for a few moments.
- Later the optical drive of the mounted ISO file will appear.
- Finished.
4. Mount ISO Files on Windows with Winrar
Unlike other mount applications, Winrar is one application that almost many people have because of its function. Like to create RAR files and extract RAR files.
Winrar can also be used to view the data in the ISO file. But not a direct way like mount, but extract it.
Here’s how:
- Please open File Explorer , then find the file you want to mount first.
- If you have found it, please right-click the ISO file.
- Then select Extract To (ISO File Name).
- If successful, a folder with the name ISO File will appear.
- Finished.
5. Mount ISO Files on Windows PowerShell
Windows PowerShell is one of the built-in features of Windows that functions more or less like CMD.
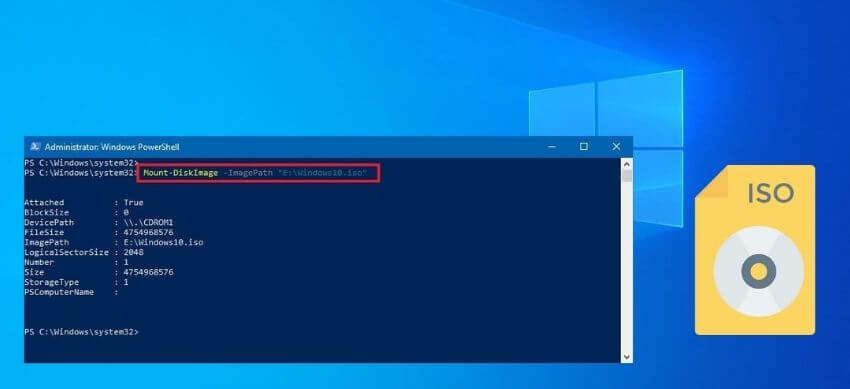
In this feature we can use various commands, which work for various things. One is to mount files.
Here’s how to mount an ISO file with PowerShell:
- First, open Windows PowerShell first by opening it in Run as Administrator.
- Enter the command Mount-DiskImage -ImagePath E:\Fedora.iso and press Enter .
- If successful, a message in PowerSheel will appear as follows:
- Finally, check in File Explorer to make sure that the ISO file has been successfully mounted.
- Finished.
Please change “E:\Fedora.iso” according to the name of your ISO file and where it is stored.
6. Mount ISO Files on Windows with Ultra ISO
The way we recommend last is to use the Ultra ISO application. Ultra ISO is similar to the applications we discussed above.
As the name implies, this application is devoted to matters related to the needs of ISO files. For example, to mount files, create ISO files, burn CDs or DVDs and so on.
Here’s how to mount an ISO file with Ultra ISO:
- Please download the Ultra ISO application first.
- Then install the Ultra ISO application on your computer or laptop.
- Later Ultra ISO will open automatically.
- Press the Open menu in Ultra ISO.
- File Explorer will open, please select the ISO file and press Open .
- Then hit the Tools tab and select Mount to Virtual Drive .
- A Virtual Drive dialog box will appear , please just press the Mount button .
- If successful, a folder will appear containing the data from the ISO file earlier.
- Finished.
So, those are the ways to mount ISO files, either with an application or without any software.
Hopefully, you are like these 6 Ways to Mount ISO Files on Windows and we are always open to your problems, questions, and suggestions, so feel free to Comment on us by filling this.
This is a free service that we offer, We read every message we receive. Tell those we helped by sharing our posts with friends

Pradeep Sharma is a author the mind behind Techjustify, where I craft insightful blogs on technology, digital tools, gaming, AI, and beyond. With years of experience in digital marketing and a passion for tech innovation, I aim to simplify complex topics for readers worldwide.
My mission is to empower individuals with practical knowledge and up-to-date insights, helping them make informed decisions in the ever-evolving digital landscape.