How to Install Epson L3210 Printer Complete Guide – The procedure for installing the Epson L3210 Printer is practical and easy, you need to understand it before using this printer.
Especially for those of you who have no experience at all with using printers. For those of you who have just bought a new printer such as the L3210 from Epson, you need to make some adjustments.
No need to worry because how to set up the first time on a new printer is not difficult at all. The Epson L3210 in new condition is generally still sealed and still in cardboard or box.
Indeed, there are also used printers being sold online to`day. However, it is not recommended to buy a used printer because this computer component usually has problems when it is old enough.
Especially on the head and other parts that can make users dizzy. Not to mention that the price of printers is currently very affordable with so many choices that can suit your needs.
For those of you who want to know how to do the first installation on the Epson L3210 printer, here is the complete tutorial.
Table of Contents
How to install Epson L3210 Printer
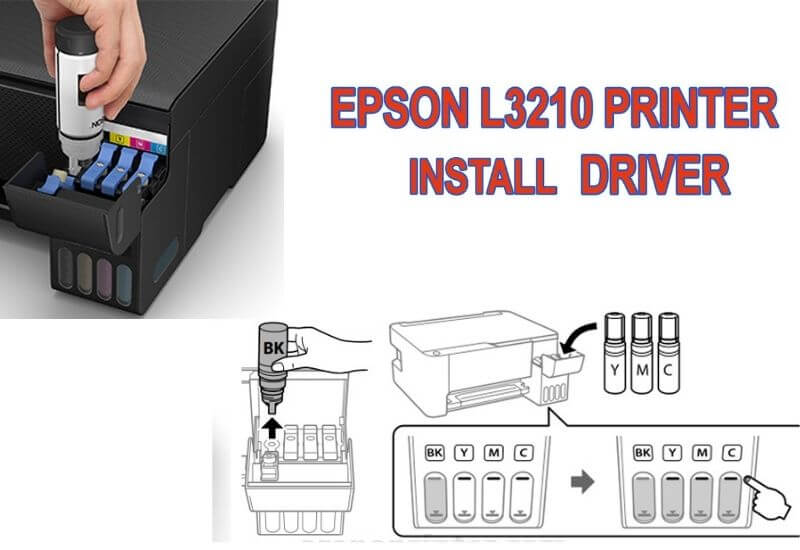
1. Fill the Epson L3210 tank with bottle ink
On the Epson L3210 printer which is completely new, when you take it out for the first time, it is still empty and there is no ink.
For that, the first thing you have to do is fill the ink tank first with the ink that is still stored in the bottle.
How to fill ink into the Epson L3210 printer tank is very practical and very easy. You only need to open the cover on the right side of the front of the printer and then you will see four tanks that you have to fill.
Do not get the wrong tank because it can be troublesome later. Fill the tank according to each color that is already marked.
Black, Cyan, magenta, yellow, or commonly abbreviated with only one letter, namely B, C, M, Y. Open the ink bottle cap and then plug it into the mouth of the tank in each color.
There is no need to squeeze the bottle because just plugging the ink bottle into the tank will automatically fill itself.
You can see the filling status on the front side of the printer, and if it is full you can close the tank cover again.
2. Turn on the Epson L3210 Printer
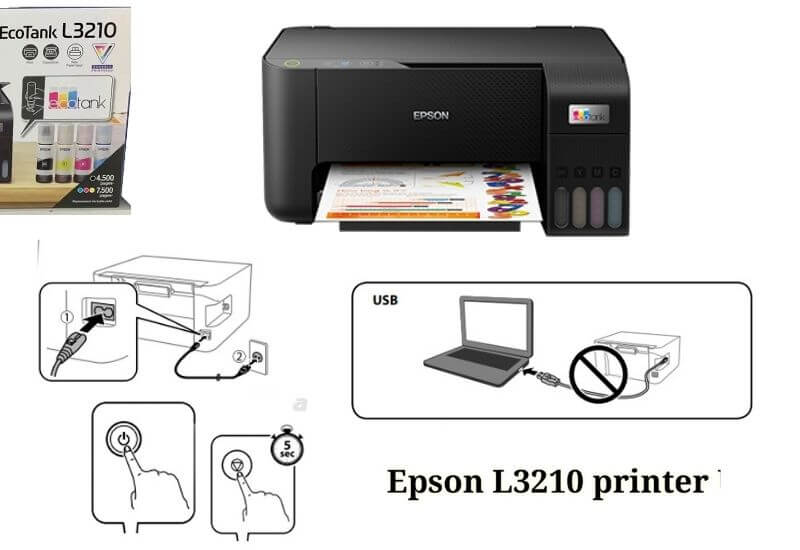
Plug the power cable into the printer and into the socket. Also, attach the data cable and connect it from the printer to the computer (desktop or laptop).
Read Also : How to Connect a Laptop to a Wireless Printer (WiFi) in Windows
Then turn on the printer by pressing the power button on the top of the printer. When it lights up for the first time, an indicator like a water drop will appear (a circle with the best triangle in it) like the picture above, which means you have to press the button and hold it for about 5 seconds.
- This aims to drain the ink from the tank to the head so that the air in the channel can come out first.
- Until now you have not been connected because you have to install the driver first.
- You can visit the official Epson website to get the latest drivers, which in this case the printer series is L3210.
- After successfully downloading and installing then you can try it for printing.
How to print for first time with Epson L3210
Prepare paper and place it on the top of the printer and if you don’t know, the maximum storage capacity is 100 sheets or you can try just a few sheets first.
Run MS Word, type something, and try to print by pressing the shortcut key Ctrl + p on the keyboard. Select the printer and after that, the printer will start printing your first word document.

Pradeep Sharma is a author the mind behind Techjustify, where I craft insightful blogs on technology, digital tools, gaming, AI, and beyond. With years of experience in digital marketing and a passion for tech innovation, I aim to simplify complex topics for readers worldwide.
My mission is to empower individuals with practical knowledge and up-to-date insights, helping them make informed decisions in the ever-evolving digital landscape.