How To Live Stream In Hd Quality With Laptop – Live streaming is one of the vital marketing tools to achieve better exposure for your content. Streaming from a laptop is the most affordable yet most accessible and efficient way.
Then again, you have to consider the HD quality stream with the built-in laptop camera and microphone. Whether you are streaming your gaming or other content on the live streaming platform, HD quality ensures good visibility of your content to attract more audiences. So, I am about to tell you how to live stream on HD quality with laptop.
Table of Contents
How to Live stream in Hd Quality With Laptop
Most people think having a good laptop is enough for live streaming the content. But, what they miss is the quality. As a result, people find their content low-quality, which ends up getting less exposure. You need to have an excellent setup to ensure HD quality live streaming from your laptop. Let’s dive into the details now.
Get a Powerful Laptop
You are about to attach multiple devices to the laptop. Therefore, you have to get a powerful laptop that can easily handle all of these tasks. Laptops for live streaming are perfect for handling loads that a regular laptop can not handle or cause heating issues for a long time streaming. This is the first requirement for ensuring HD live streaming.
Internet Speed
It is the major obstacle for HD live streaming. Especially on the home internet, you get less upload speed that can not provide HD streaming at all. Also, a stable internet connection is a crucial factor for streaming. So, you have to rely on an ethernet connection over the WiFi to ensure stable internet speed.
Before starting any live stream, check your internet speed first. Make sure it can handle your footage easily. If you are gaming and streaming at a time, I’d suggest having at least 25Mbps stable internet speed.
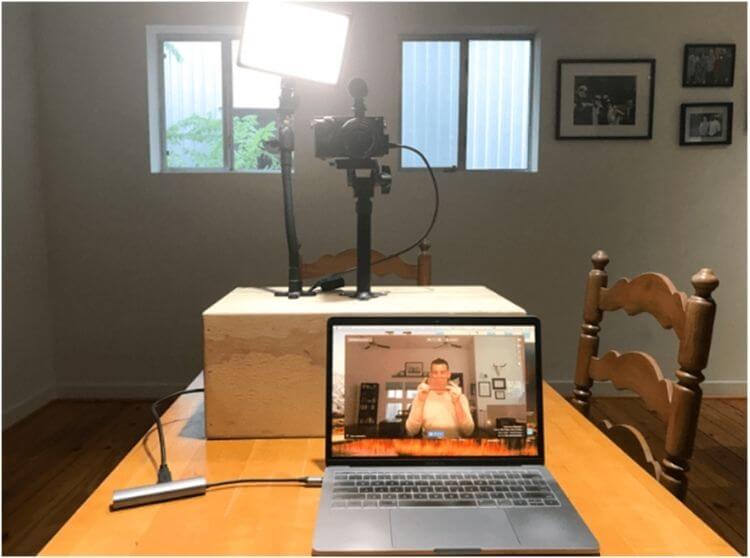
Select A Camera
Let’s admit that a laptop camera cannot provide HD streaming by any means. Although getting a webcam can solve this, the better choice would be adding a DSLR or Mirrorless camera that provides HD resolution video with good quality. Usually, the camera connects with the laptop via HDMI to transfer video and audio simultaneously.
However, most DSLR and mirrorless cameras allow you to record a maximum of 30 minutes of video for overheating issues. Although you can hack that setting, overheating can damage or reduce your streaming quality.
If you plan to stream for more than 30 minutes, getting a camcorder is the best solution. Make sure it has HDMI output for use on the laptop. Therefore, it can transfer footage to the laptop along with sound.
Get A Microphone
Sound is equally essential as HD footage for quality live streams. And laptop microphone is never going to provide that superior quality that you need for your streaming. Usually, you have to connect the microphone with your camera, not directly to the laptop.
Some microphones are available in USB, which you can directly connect to the laptop. However, you have to sync that properly with the camera footage. So, adding a microphone with the camera is the ideal choice for that.
Arrange Proper Lighting
After adding the camera and microphone, you have to go for a good lighting setup. But only good lighting can ensure the desired footage. And there are many lighting setups available in the market. Make sure to get proper lights with a diffuser to ensure smooth lighting.
Install Streaming Software

Although you can stream directly to the platform without having any additional software, managing all of the audio and video sources is not easy. Therefore, you must get additional software for smooth live streaming with better control. In that case, OBS is the most popular and efficient software for live streaming.
Go to the OBS setting and adjust the broadcast setting by selecting your desired streaming platform. OBS supports many different streaming services, including YouTube, Twitch, and Facebook.
Once you have selected your streaming service, you will need to configure your video settings. In the “Video” tab, you will need to select the “Encoder” option and then select the “H.264” codec. You will also need to select the “Bitrate” and “Frame Rate” options. You have to adjust it based on your internet speed. But the minimum can go to the 30fps frame rate and 3000 kbps bit rate.
In the “Audio” tab, you will need to select the “Encoder” option and then select the “AAC” codec. You will also need to select the “Bitrate” and “Sample Rate” options. 128kbps bitrate and 44.1 kHz sample rate are enough to ensure a decent quality.
Test Before Going Live
Now you have all the necessary stuff for going live. But never hurry to do that before checking everything. So, test your live streaming before starting live-stream from your laptop. Check the following things to ensure you are not messing up anything.
Read Also: 5 Ways to Stream Heavy Games on PCs and Laptops in 2022
How to start a YouTube stream yourself?
Lighting
When you are recording with a high-speed camera, it requires a lot of light to deliver quality footage. So, make sure your lighting is perfect and also placed in the proper position. And it should not bother you while you are streaming.
Camera
The next thing is the camera footage. Adjust the angle to get the proper frame that you are comfortable sharing. Make sure the camera is in focus. Keeping autofocus is the efficient way to do it.
Read Also: Lightweight PC Screen Recorder Application Free 2022 (No Watermark)
Sound
Check the sound if it is too loud or less than standard. Adjust it, and if you are getting a noise filter, that too. You can adjust the bass and treble to get the proper sound that pleases the ears. Also, make sure the audio syncs well with the video.
After feeling comfortable with the setup, you can now go for a live stream in HD quality from your laptop.
Conclusion
That is how to live stream in HD quality with laptop. After doing an HD quality stream, you will see a massive difference in your social media presence. It will provide better exposure and improve your overall content quality.
Although the setup seems pricey, it is worth every penny, that is for sure. However, you can add a quality webcam to cut all these costs and go for live streaming. It will not give you the ultimate HD quality, but you can work with it initially.

Pradeep Sharma is a author the mind behind Techjustify, where I craft insightful blogs on technology, digital tools, gaming, AI, and beyond. With years of experience in digital marketing and a passion for tech innovation, I aim to simplify complex topics for readers worldwide.
My mission is to empower individuals with practical knowledge and up-to-date insights, helping them make informed decisions in the ever-evolving digital landscape.