
How to Customize Robots.txt file on Blogger – platform fingers to prevent crawling of post or page data or images.
The robots.txt file is a file that must reside in the storage root of the domain; just to give an example if a site has the address example.com then the robots.txt file must have as URL example.com /robots.txt.
This is a simple text file proposed way back in 1994 that quickly became a standard for all search engines.
Through the robots.txt file, the site administrators give instructions to the crawlers who scan the pages of the domain.
You can enter instructions to make the engines ignore specific files, directories, or URLs.
The syntax of robots.txt files is standard and, in the event that such a file does not exist on a site, the engines will scan it in its entirety without exception.
The engines that follow the robots.txt standard are Ask, AOL, Baidu, DuckDuckGo, Google, Yahoo! and Yandex while Bing is only partially compatible.
The robots.txt file is structured to indicate the name of the crawler and the name of the pages that are allowed or denied crawling.
The commands are essentially three: User-agent, Allow and Disallow. The first indicates the name of the crawler, the second indicates the pages that can be crawled and the third indicates the pages that cannot be crawled.
To indicate all crawlers we use the asterisk symbol ( * ) while to indicate all the pages of a domain we use the slash symbol ( / ). Let’s take a couple of examples. A robots.txt file that contains this text
User-agent: *
Allow: /
indicates that all engines are allowed to crawl the entire site. Instead this robots.txt file
User-agent: *
Disallow: /
tells all crawlers not to index anything on the site. For more complete information on how to create and customize the robots.txt file, you can consult this instruction page from Google .
BLOGGER’S ROBOTS.TXT FILE
All domains of sites on the Blogger platform , of the free type nomeblog.blogspot.com and with a custom domain ,
Automatically have the robots.txt file in the storage root or a blog with the myblog.blogspot.com domain will have the robots.txt in the URL myblog.blogspot.com / robots.txt.
The robots.txt Blogger has this generic structure
User-agent: Pradeep -Google
Disallow:
User-agent: *
Disallow: / search
Allow: /
Sitemap: https: // nameblog.blogspot.com /sitemap.xml
where the last line is that of the Sitemap , which obviously varies according to the domain of the site.
The first two lines allow Google’s advertising partners to crawl the entire site. The lines from the third to the fifth allow all crawlers to crawl the entire site, with the exception of the URLs with / search or the label pages, which Blogger has decided not to scan to avoid redundancy with the URLs of the posts. .
However, those who have a site with special needs can customize this robots.txt file from the Dashboard .
Go to Settings -> Search Preferences -> Crawler and Indexing -> Custom Robots.txt File and then click Edit next to Disabled. Check Yes to customize the file.
ROBOTS.TXT FILE CUSTOMIZATIONS
1) Block a post or page URL to prevent crawling – Type these lines
Disallow: /2019/10/titolo-post1.html
Disallow: /p/name-page1.html
then go to Save Changes .
IMPORTANT: The lines must be added to those already present in the original file. This complete text must then be pasted into the test example.
User-agent: Pradeep -Google
Disallow:
User-agent: *
Disallow: / search
Allow: /
Disallow: /2019/10/titolo-post1.html
Disallow: /p/page-name1.html
Sitemap: https: // blogname .blogspot.com / sitemap.xml
Basically you have to add the lines to the pre-existing ones .
2) Block the indexing of the images – To the initial text of the file it is necessary to add these lines:
User-agent: Googlebot-Image
Disallow: /
to have a final result like the following:
User-agent: Pradeep-Google
Disallow:
User-agent: *
Disallow: / search
Allow: /
User-agent: Googlebot-Image
Disallow: /
Sitemap: https://nomeblog.blogspot.com/sitemap.xml
After a change, open the robots.txt file by pasting its URL into your browser to check that it is correct.
CUSTOMIZE THE ROBOT HEADER TAGS
Another system can also be used to customize robots.txt. You always go to Settings -> Search Preferences but this time you choose Custom Robot Header Tags -> Edit.
After checking Yes, we will see options to act on. We can apply the tag file robots.txt separately to the Homepage, the pages of Archive and Search and Default Settings for Posts and Pages .
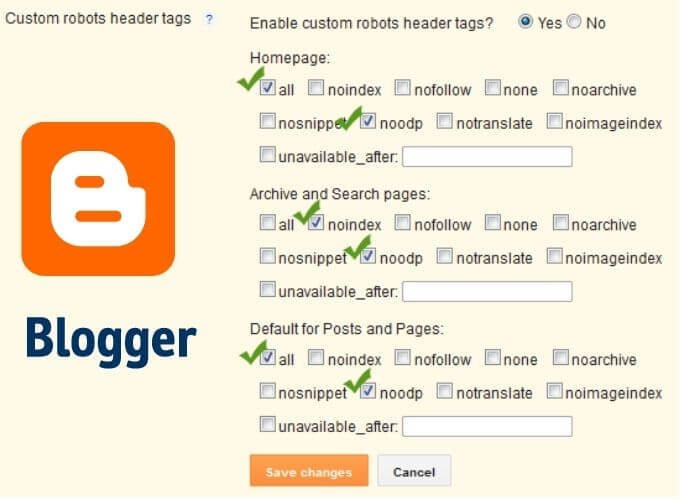
Instructions for using these tags can be found on this page . Using these tags does not modify the robots.txt file but presumably, it adds lines of code to the HTML of the pages. Since their use is not very clear, I recommend using them with caution.
We are always open to your problems, questions, and suggestions, so feel free to Comment on us by filling this. This is a free service that we offer, We read every message we receive.
Tell those we helped by sharing our posts with friends or just liking to Follow Instagram, Twitter and join our Facebook Page or contact us Gmail, Linkedin, etc

Pradeep Sharma is a author the mind behind Techjustify, where I craft insightful blogs on technology, digital tools, gaming, AI, and beyond. With years of experience in digital marketing and a passion for tech innovation, I aim to simplify complex topics for readers worldwide.
My mission is to empower individuals with practical knowledge and up-to-date insights, helping them make informed decisions in the ever-evolving digital landscape.