How to manage subtitles on Disney + – Have you decided to improve your English skills by watching your favorite Disney + TV series in the original language but with the help of subtitles? Easily achievable idea!
As you know, in fact, the mainstreaming platforms offer, yes, a large repertoire of translated content, but there are also absolute gems that are worth seeing in the original language.
For this, I thought I’d offer you a tutorial on how to manage subtitles on Disney +. In this way, you will be able to activate and customize them as you wish.
Table of Contents
How to manage subtitles on Disney +
- Languages available
- How they are activated
- How they personalize
- Browser customization
- Personalization from Android
- 1.Customization from Chromecast
- 2.Customization from iOS
- 3.Customization from Roku
- Console customization
- Personalization from smart TV
- Customization from Amazon Fire TV and Amazon Fire Stick
- How they deactivate
Languages available

Disney + is committed to providing the best of the content of the moment (and not only) dubbed and – to quote the official press release
With the support of ” superimposed subtitles for people who are deaf or hard of hearing (SDH) “.
At the time of writing, in particular, support is extended to a maximum of 16 languages
(Danish, English, Spanish and Latin American Spanish, French and Canadian French, Italian, Dutch, Norwegian, Portuguese and Brazilian Portuguese, Finnish, Swedish, German, Polish).
Which will probably become more depending on the diffusion of the service in other countries.
How they are activated

The tutorial you are about to read will allow you to set subtitles to Disney + on all devices.
In fact, you will be able to retrace the steps that I am going to list both using the official app for mobile devices and the smart TV.
Here are the steps to follow:
- Open Disney + and log in with your credentials;
- Start the content (TV series, film, documentary) you want to see with subtitles;
- Tap (or click) on the small icon dedicated to audio and subtitle settings (located at the top right);
- Choose the language in which you want to play the content and set the subtitle language always with a tap (if you are watching Disney + on the app) or with a click (if you are using a browser).
Keep in mind that for mobile devices and smart TVs, once you have made the choice of audio and subtitles, the settings screen will close automatically, so as to give you a complete view of the chosen content.
On the browser, however, you will have to click on the “Back” arrow, in order to return to the movie or TV series you were streaming.
How they personalize
You can customize the look and feel of the subtitles on Disney +. Unlike what has been said for activation,
However, this procedure is specific to each category of devices (although, to be honest, the instructions vary very little). Details below.
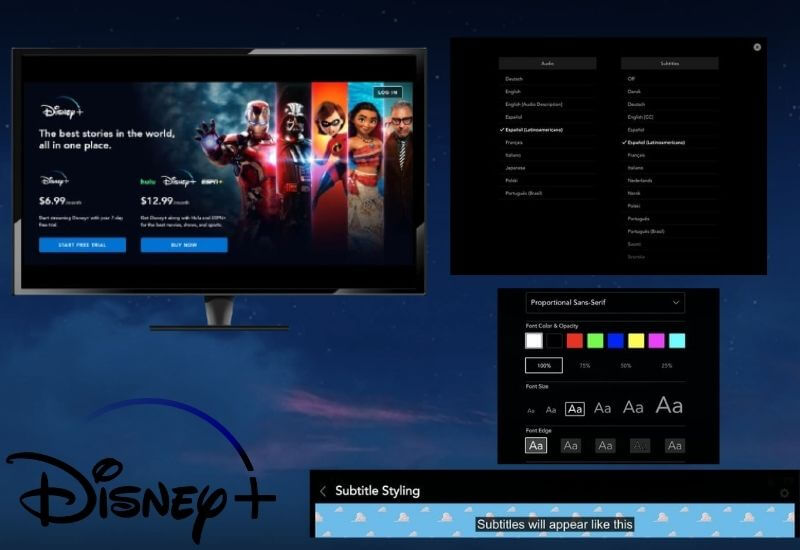
Browser customization
Changing the appearance of Disney + subtitles from the browser is probably the simplest and most complete way.
Among other things, at the time of writing and, differently from what is reported in the FAQ of the official Disney + site,
According to my tests, the customization of the appearance of the subtitles is only possible via the browser.
I’ll explain how to do it:
- Connect to Disney + with your account and select the content to view;
- When playback starts, you will see the icon dedicated to audio and subtitle customization appear (top right) , click on it;
- At this point, the menu dedicated to editing the audio (on the left) and subtitles (on the right) will open, and you will also notice a small gear-shaped icon , dedicated to changing the style of the subtitles.

Once you have accessed the editing section, you can act by changing:
- Font;
- Font color and opacity;
- Percentage of font opacity;
- Font size;
- Font outline color;
- Outline color and opacity;
- Percentage of outline opacity;
- Window color and opacity.
As you can see, every time you make a change, a preview will be shown in the top bar.
If, on the other hand, the changes made do not convince you, you can restore them by scrolling to the end of the menu and clicking on ” Restore defaults “.
Personalization from Android
To change the appearance of subtitles on Android tablets and phones, you will need to follow these steps:
- Open the Disney + app and tap on your avatar ;
- Follow the path
Settings> Accessibility> Caption Preference> Use Captions. - Choose the size and style you prefer.
At the time of writing, however, I understand that the subtitle customization procedure is no longer possible from Android devices (smartphones and tablets).
1.Customization from Chromecast
If you’re using a device like Google Chromecast or another HDMI dongle, you’ll simply need to set subtitle preferences on the phone or tablet you’re casting from.
2.Customization from iOS
On Apple devices running iOS 13.0.0and later versions, subtitle customization can be done by following these steps:
- Access Disney + via the app;
- Follow the path
Settings> Accessibility> Subtitles and Captions> Style; - At this point, all you have to do is choose from the styles already present or create your own (in this case, you will have to disable the “Video exclusion” function).
If, on the other hand, you have an iPhone or an iPad that is equipped with a version of iOS older than the one indicated above or an Apple TV, follow these instructions:
- Log into Disney + ;
- Follow the path
Settings> General> Accessibility> Subtitles and Captions> Style. - Proceed by choosing the subtitle style you prefer from those available or create your own.
3.Customization from Roku
Changing the look of subtitles on Roku is super easy – go to Settings and follow the path Accessibility> Style and captions. At this point, choose the attributes you prefer.
Console customization
If you use the Sony PlayStation , follow the path Settings> Accessibility> Subtitles on screen> Show subtitles on screen> Subtitle settings on screen and customize them to your liking.
If you’re using Microsoft ‘s Xbox , do this: Press the Xbox button on the joystick and follow the path Systems> Settings> Ease of Access> On-Screen Subtitles. At this point, edit them to your liking.
Personalization from smart TV

Starting any content on Disney +, the icon related to audio and subtitles will appear at the top right.
Select it and choose the “ Subtitle Style ” option, then make the changes you want.
Customization from Amazon Fire TV and Amazon Fire Stick
From the home screen, go to Settings and then choose Accessibility> On-screen subtitle preferences.. At this point, customize them as you see fit.
How they deactivate
When you are tired of reading, or you simply decide to see and listen to the content in your native language – that is, without subtitles -, you just need to deactivate this function.
To do this, proceed as follows:
- Log in to Disney + ;
- Start playing a content ;
- Click (or tap) on the subtitles icon ;
- In the “ Subtitles ” section , select the “ Off ” item;
- Go back to viewing the content, now the subtitles will no longer be displayed.
You can reactivate this function at any time. Hopefully, you like this article How to manage subtitles on Disney +
Read Also : How to use HBO from a TV with Roku to watch series and movies?
We are always open to your problems, questions, and suggestions, so feel free to Comment on us by filling this. This is a free service that we offer, We read every message we receive.
Tell those we helped by sharing our posts with friends or just liking to Follow us on Instagram, Twitter and join our Facebook Page or contact us on Gmail, Linkedin, etc

Pradeep Sharma is a author the mind behind Techjustify, where I craft insightful blogs on technology, digital tools, gaming, AI, and beyond. With years of experience in digital marketing and a passion for tech innovation, I aim to simplify complex topics for readers worldwide.
My mission is to empower individuals with practical knowledge and up-to-date insights, helping them make informed decisions in the ever-evolving digital landscape.