How to Connect Monitor to Pc – Have you bought a Monitor but don’t know how to connect it to your computer?
Table of Contents
Identify Video Connectors and Video Ports
To correctly connect the monitor to the computer, it is first necessary to identify which video connectors and video ports are available both on the monitor and on the PC. In this way it will be possible to understand which is the most appropriate cable to connect the monitor to the computer.
Types of Video Connectors
To allow the connection of the monitor to the computer, there are different types of video connectors which, in general, can be either digital or analog. However , to obtain the best possible image quality, as well as better control by the computer software tools , it is always preferable to use a digital connector instead of an analog one.
Among the various types of video connectors available, the most common ones are HDMI, DisplayPort, DVI, VGA, S-Video, RCA, and sometimes even USB-C:
the HDMI connector allows you to make a digital connection and allows the transfer of audio and video signals in high definition . This type of connector is among the most used nowadays and is present on computers, monitors, projectors, decoders, smart TVs and any other compatible electronic device.
There are different types of HDMI connector but the most used one is this one , called in jargon type A connector , with the ends usually black;
DisplayPort connector
the DisplayPort connector allows you to make a digital connection and, just like HDMI, allows the transfer of audio and video signals in high definition. The DisplayPort connector usually has gray or black ends and, unlike HDMI, there are only two types: the one most used on desktop computers and monitors is this , while the one most used on laptops is this other (called Mini DisplayPort );
DVI connector
the DVI connector allows you to make a digital and/or analog connection depending on the case, allowing the transfer of high definition video signals. The DVI connector comes in three variants: DVI-I (which allows you to transfer both digital and analog signals), DVI-D (which allows you to transfer digital signals only), and DVI-A (which allows you to transfer analog signals only).
DVI-I and DVI-D variants
The DVI-I and DVI-D variants can also be single link or dual link. Regardless of the variant used, on desktop computers the DVI connector always looks like this (usually with white ends) while on some laptops it is also possible to find the Mini-DVI or Micro-DVI connector ;
VGA connector
The VGA connector , also sometimes called D-sub, allows you to make an analog connection and allows the transfer of video signals. The VGA connector almost always looks like this with the ends usually being blue;
S-Video connector
the S-Video connector allows you to make an analog connection and allows the transfer of video signals. The S-Video connector has a circular shape and almost always has this aspect with the ends usually black;
RCA connector
the RCA connector , commonly used for composite video , allows you to make an analog connection and allows the transfer of video signals. The RCA connector has a circular shape and almost always has this aspect with the ends usually yellow;
USB-C connector
the USB-C connector , also called USB Type-C or USB Type-C allows both data (video and/or audio) and electric current to be transmitted (thus allowing, in some cases, to power a laptop). The USB-C connector looks like this and being symmetrical it can be connected regardless of the direction of the cable.
Types of Video Ports
Depending on the computer used, there may be one or more (identical and/or different) video ports that may or may not be in a certain position:
On desktop computers, the video ports are located behind the case and can be placed horizontally and/or vertically. Commonly, horizontally placed video ports are those that are part of the dedicated video card while vertically placed video ports are part of the integrated video card ;
On notebooks, netbooks, and ultrabooks , the video ports may be on the back, right side, or left side of the laptop. Unlike desktop computers, laptops have video ports only horizontally (as in this example).
As for the monitor, the video ports are almost always located in the back of the latter and can be directed both downwards and outwards (protruding by a few centimeters). On desktop computers, when arranged horizontally behind the discrete graphics card , the most common video ports look like this, for example:
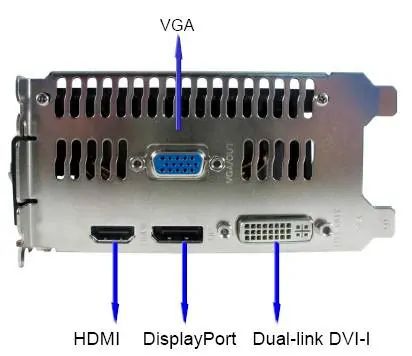
From this image you can see a VGA port (top), an HDMI port (bottom left), a DisplayPort port (bottom center) and a DVI port in the DVI-I variant (bottom right).
How to Connect Monitor to Pc
Once you have identified the common video ports between your monitor and computer, you can now connect your monitor to your PC using the most suitable cable. The cable that must be connected between the monitor and the computer takes the name of the connectors found on the cable in question.
Therefore it is called “VGA cable” if the cable has VGA connectors, it is called “DVI cable” if the cable has DVI connectors, it is called an “HDMI cable” if the cable has HDMI connectors, and so on.
If your computer and/or monitor do not have the same ports, and therefore the same connectors (for example, there is a VGA port behind the computer while there is only a DVI port behind the monitor), in some cases it could also need to purchase adapters to allow connection of the monitor to the video card of the computer.
However, once you understand which cable is right, to connect the monitor to the PC, proceed as follows:
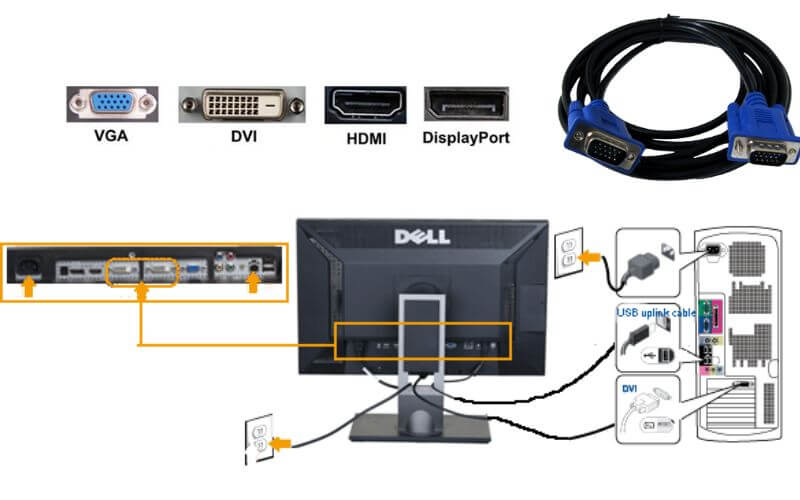
Connect the cable to the most appropriate video connector by first inserting one end into the port behind the monitor and then the other end into the port located on the back of the computer (which, as already mentioned, can be either vertically or horizontally depending of the video card present in the PC). When doing this, remember that most computer cables only fit one way.
Therefore, make sure that the video connector is aligned with the chosen video port and then connect the cable by applying a little pressure.
If the cable connector doesn’t fit into the chosen port or maybe it goes too wide, then it means that either you have the wrong cable or you have the wrong port, so don’t force the insertion because you could also damage the connector contacts. When possible,
Now connect the monitor’s power cord first behind the monitor itself (usually the power cord plugs into a small circular black port labeled DC IN ) and then into a power outlet.
If your monitor has an external power supply, connect one end of the power cord to the monitor’s power supply, then plug it into an electrical outlet, and then plug the power cord into the port on the back of the monitor;
optional. If your monitor has built-in speakers and/or a headphone port, you can also plug the jack into the audio port on the back of the monitor at this point.
However, here is an image to better clarify what the most common ports on the back of a monitor usually look like:
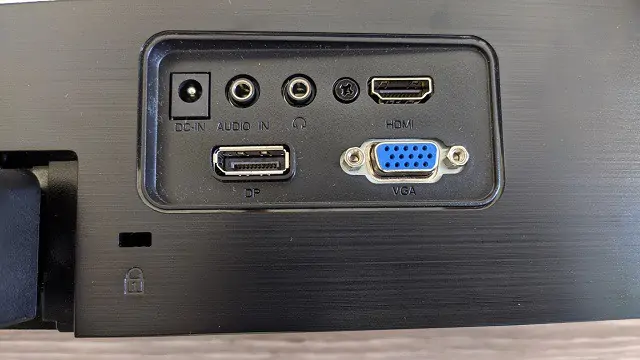
From this image it is possible to see at the top left the power socket for connecting the external power supply, then there is the audio port that allows you to connect the jack connector for the integrated speakers, and immediately there is another audio port for connecting the headphone jack, while an HDMI port is located at the top right.
At the bottom left you can find a DisplayPort port and at the bottom right a VGA port. Also, at the bottom left end, you can also find the Kensington Security Slot (also called K-Slot or Kensington lock).
Once you have successfully connected the video cable and power cable, you can now proceed to turn on the monitor by pressing the appropriate key (usually located either at the bottom right of the front frame of the monitor or on the back of the monitor itself), after which you just have to turn on the PC.
Adjust Monitor Settings
In most cases, after following the steps for connecting your monitor to your computer, you should be able to view the images on your screen without any problems.
- If, once the PC is started, the screen remains off or the message “No video input”, “No signal”,
- “Check the video cable” or something similar appears
- Then it means that either you have connected the monitor to the PC wrongly, or that you need to choose the correct video signal source in the monitor settings menu.
Therefore, first check that you have correctly connected the cable between the monitor and the computer (replacing the cable used if necessary).
If everything is fine, then you need to change the video signal source in the monitor settings as the screen expects the video signal input from the VGA port, for example, while the computer sends the signal instead to the HDMI port or the DVI port .
To make this modification you have to act directly from the monitor itself, therefore you just have to consult the instruction manual of the monitor to understand how to do it (even if, usually, it is enough to directly press a button on the monitor several times to change the source of the video signal).
After the operating system starts, the monitor should be detected correctly without the need to install any additional drivers or software. However, if you want to make changes, such as adjusting the size of the text or enlarging the screen, then you could consult this page if you are using Windows 10 as your operating system.
If you are using macOS as your operating system, to change video settings or improve text, you could consult instead this other page.
So at this point, you should have finally figured out how to connect monitor to PC

Pradeep Sharma is a author the mind behind Techjustify, where I craft insightful blogs on technology, digital tools, gaming, AI, and beyond. With years of experience in digital marketing and a passion for tech innovation, I aim to simplify complex topics for readers worldwide.
My mission is to empower individuals with practical knowledge and up-to-date insights, helping them make informed decisions in the ever-evolving digital landscape.