There are several easy and efficient ways to make the Fix Colons in Word parallel. The easiest and straightest way is to take advantage of the Tab and Ruler features in our MS Word.
Table of Contents
How to Make Parallel and Straight Colons in MS Word
- Create a new MS Word document or open the document file you want to edit.
- Make sure the Ruler has appeared on our ms word work page, if not we just check in the View menu in the ribbon window, then check the Ruler column to display it.
- Make sure the Left Tab sign symbolized by the letter L in the upper left corner of the Ruler has appeared. If not, left-click until it changes its sign with a sign that resembles the letter L (Left Tab).
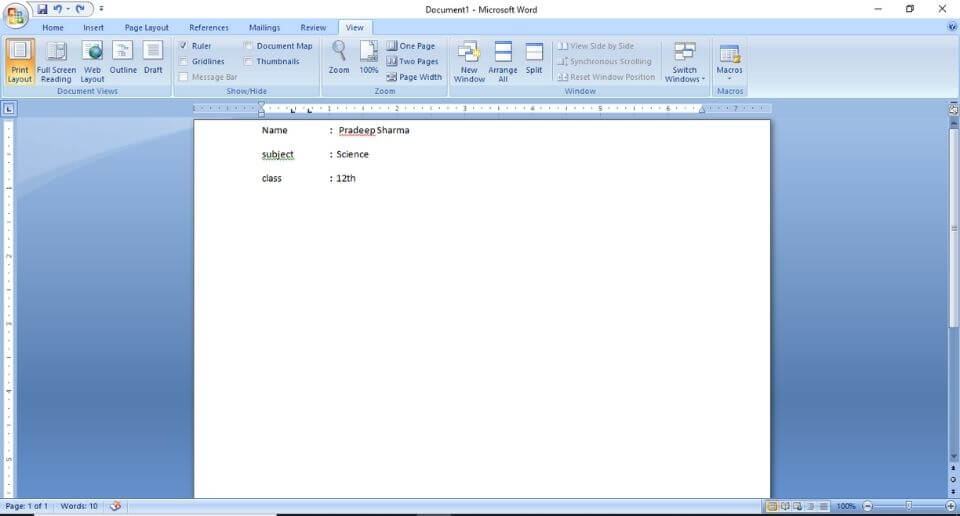
- Make several lines of description/writing which we will later put a colon at the end of each of these descriptions. Example: Name, Subject, Class.
- Block the entire text.
Many of us already know that the features in the MS Word application vary. But sometimes we still don’t know each of these features.
So we often find difficulties that can actually be solved if we understand the features.
One common example is in the case of smoothing colons. Usually, for the purpose of filling in the data, a colon is made at the end of each desired statement.
Such as Name: , Date of Birth: , and so on. Writing a good Fix Colons in Word is its placement parallel between the lines of one another.
Read Also : How to Show Ruler in Microsoft missing Word
- Determine the distance to place the colons.
- Left-click once on the Ruler number at the top of the page according to the distance we want until a Left Tab sign appears marked with the letter L on the ruler to create a new tab.
- Specify the distance to position the data entry after the colon.
- Left-click on the desired Ruler number to determine the distance between the fields after the colon and a new Left Tab sign appears to create a second tab.
- Place the cursor at the end of each caption and then press the Tab key on the keyboard, then the cursor position will match the placement of the first tab.
- Make a colon in each description.
- Place the cursor after the colon we made and press Tab then the cursor position will match the placement of the second tab.
- Fill in the data in each line of writing as needed, then both the colon and the data entry will look parallel and neat.
If the data input in each description is more than 1 line, then we must use a Hanging Indent so that the data entry is aligned with the Fix Colons in Word above it.
The method is quite easy, just by sliding the Hanging Indent (bottom triangle sign on the top ruler) until it is parallel to the data.
Left Tab sign function in MS Word Ruler
In step 3 above we have to make sure that we have Left Tab selected in the ruler on the left. If it is not a Left Tab, then we just need to click it many times until the Left Tab appears.
The function of the Left Tab is to align the text, especially those on the left of the document page according to the specified tabulation number/distance.
How to determine or make tabulations, we just need to left-click once in the number area on the top ruler as needed until the Left Tab (L) sign appears.
After the L sign appears on the top ruler according to the desired distance, we only need to press the TAB key on the keyboard, the cursor will go in a straight direction with the mark.
Now, to remove it, simply click on the Left Tab (L) sign on the top ruler and then drag it down so that the mark disappears.
Closing
Only by using the Tab and Ruler menus, we can tidy up the writings that contain Fix Colons in Word in our MS Word documents.
Looks simple but very useful so we don’t need to press SPACE repeatedly to align.
We are always open to your problems, questions, and suggestions, so feel free to Comment on us by filling this. This is a free service that we offer, We read every message we receive.
Tell those we helped by sharing our posts with friends or just liking to Follow us on Instagram, Twitter and join our Facebook Page or contact us on Gmail, Linkedin, etc

Pradeep Sharma is a author the mind behind Techjustify, where I craft insightful blogs on technology, digital tools, gaming, AI, and beyond. With years of experience in digital marketing and a passion for tech innovation, I aim to simplify complex topics for readers worldwide.
My mission is to empower individuals with practical knowledge and up-to-date insights, helping them make informed decisions in the ever-evolving digital landscape.