How to open a USB Drive on Windows 10 – You recently bought a new computer equipped with Windows 10 and, accustomed as you are to the old versions of the Microsoft operating system, having to deal with the new interface of the latter has almost blown you away!
As the days went by, you were able to get into the dynamics of this new system and perform some basic operations.
Table of Contents
How to Open USB Drive on Windows 10
Nonetheless, there are still some operations that you used to perform with simplicity and now find it difficult to complete … also because you are not really a technological type.
One of these is to open a USB Drive on Windows 10 to access the documents you need, and therefore you are looking for a guide that teaches you how to do this.
Well, I am happy to announce that you are in the right place, at a time that could not have been better: in fact, below I intend to explain to you in detail the most effective methods to perform this operation on the latest generation operating system at home. Microsoft.
Finally, I will also show you some emergency procedures, to be put into practice in case the key is not recognized correctly.
So what else are you waiting to get started? Take a few minutes of free time for yourself, make yourself comfortable, and read very carefully everything I have to say on the subject:
I can assure you that, once you have learned all the notions listed in this guide, reading USB Drive on Windows 10, for you, it will have no more secrets. Seeing is believing!
How to Open USB Drive via autoplay
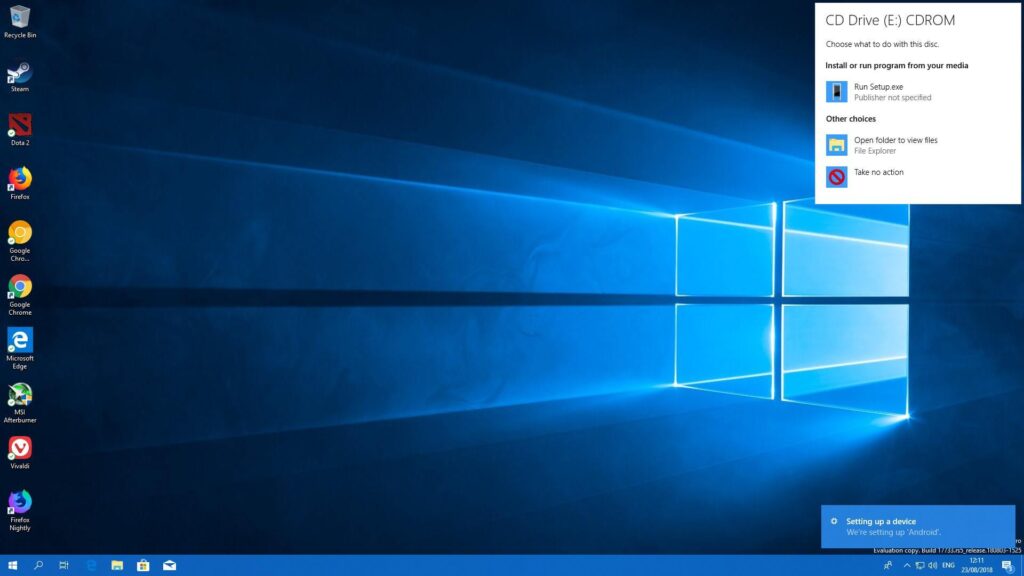
The first method to open a USB key on Windows 10, as well as the simplest, is to use the automatic playback feature of the Microsoft operating system: in doing so, Windows will propose a series of choices to manage the drive just inserted into the system; choices that can be selected with a click.
To use it, the first thing you need to do is connect the key to one of the free USB ports on your computer and wait for a notification balloon to appear in the lower right corner of the screen regarding the insertion of the new device.
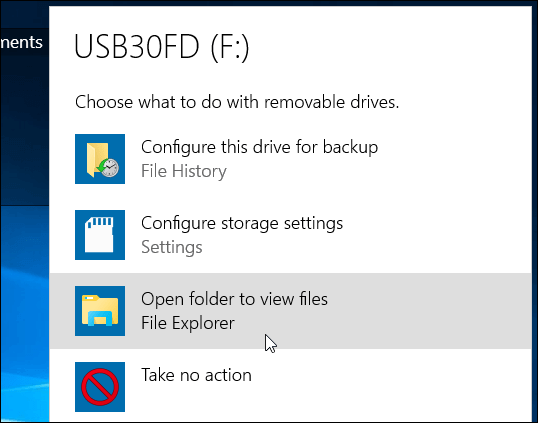
Without delay, click on the latter (which is displayed only for 10 seconds) and, using the box that appears at the top, choose the operation to be performed that is most appropriate to your needs.
For example, you can choose to Open the folder to view files in a File Explorer window (the Windows file manager), Play the audio files on the key using one of the multimedia programs installed on the operating system, Play photos in presentation mode or simply do nothing.
Keep in mind that the choices available during autoplay may vary both according to the programs installed on your computer and based on the contents of the key itself.
If you wish, you can disable the autoplay feature (or AutoPlay ) for USB sticks or, in general, for all devices, acting from the Settings panel.
To proceed, open the Start menu by clicking on the flag-shaped icon located in the lower-left corner of the screen, press the ⚙ button, and then on the Devices item residing in the panel that is shown on the screen.
Once you have reached the next window, go to the AutoPlay section by clicking on the entry of the same name and choose the operation to be carried out for each of the devices already connected to the computer at least once:
To disable the appearance of the notification balloon and therefore of the automatic execution functions, you must set the item No operation for each of them.
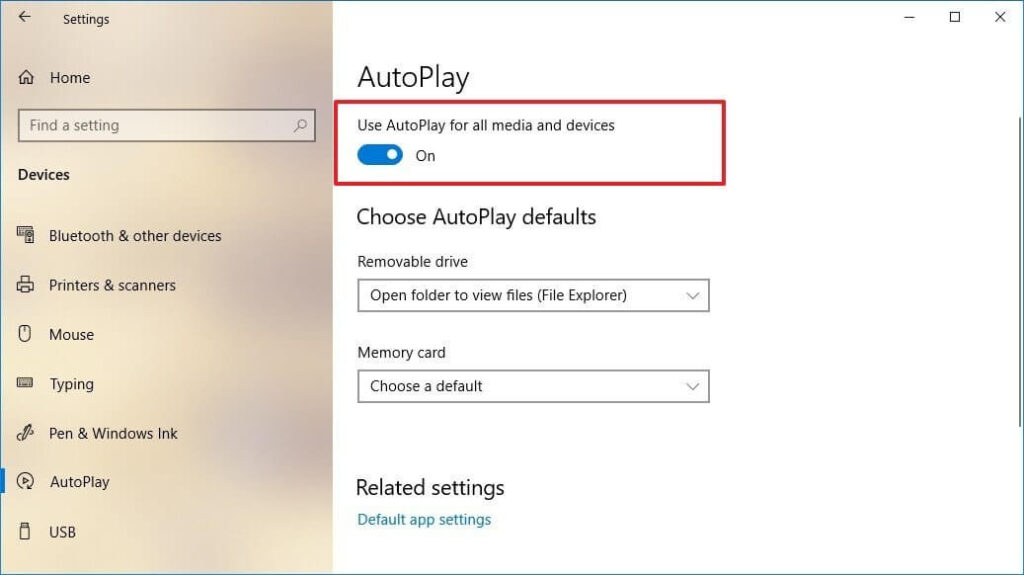
If, on the other hand, you want to disable AutoPlay for all devices that will be connected to the computer (USB sticks, optical media, smartphones, cameras, and so on), known and not, you simply have to move the switch located immediately under the heading Use AutoPlay to Disabled. for all media and devices.
Once this is done, you will have to “manually” open the devices whose content you intend to read, as I explained to you in the next section, using File Explorer.
Open USB Drive via File Explorer
Were you unable to click on the comic in time or, again, the autoplay options were disabled and the notification didn’t appear at all? You can still view the files on your USB stick using File Explorer, the integrated manager in Windows.
To use it, click on the yellow folder icon located in the lower Windows bar, identify the This PC resident section in the left part of the window and, if this is collapsed, expand it by clicking on the corresponding arrow.
At this point, you simply have to click on the icon relating to the USB key to immediately view the files and folders contained within it.
Alternatively, you can obtain the same result by double-clicking on the This PC icon located on the desktop and, subsequently, repeat the operation on the icon that identifies the USB key residing in the Devices and drives pane.
Open USB Drive via Disk Management
If you are unable to view the contents of your USB stick with either of the two methods discussed above, since it does not appear in File Explorer, you can try to open it using the integrated disk management utility.
Usually, this solution is extremely effective when Windows 10, for one reason or another, can correctly read the key but cannot assign it a drive letter with which to identify it in File Explorer.
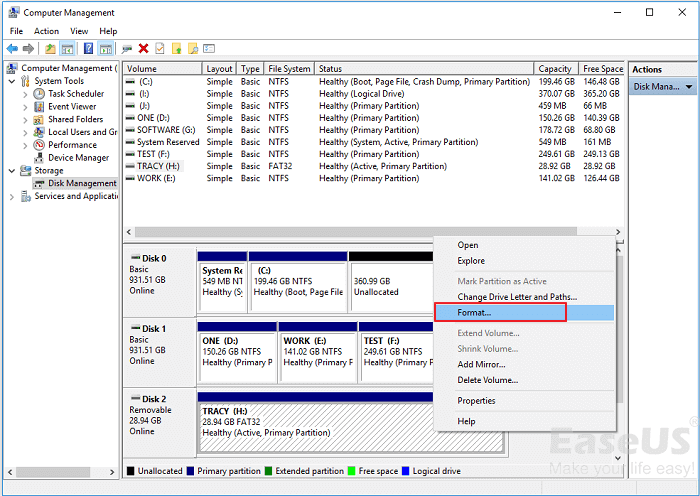
To proceed, right-click on the Start button located in the lower-left corner of the screen and select the Disk Management item from the menu that opens.
Subsequently, identify the name of the USB stick in question (eg Kingston ) from the list of storage drives connected to the computer, right-click on it and select the item Change drive letter and path… from the proposed context menu.
At this point, click on the Add … button located in the small window that opens on the screen, put the checkmark next to the Assign this drive letter item, select the first free letter (eg F 🙂 from the corresponding drop-down menu and presses the OK button to confirm the assignment.
If everything went well, you should be able to view the contents of the key in File Explorer: to check it immediately, right-click once again on the USB key icon in the Disk Management window. and select the Open item from the proposed context menu.
Note: to avoid unexpected behavior on the part of any “outdated” programs, avoid assigning the letters A: and B: to the key, as they were originally dedicated to floppy disks.
In case of problems
Have you slavishly followed the instructions I gave you in the course of this guide, but still failed to open a USB key on Windows 10? Then the problem may be a little more serious than it appears: you can try to fix it by following the instructions below.
Check that the key is intact / correctly formatted
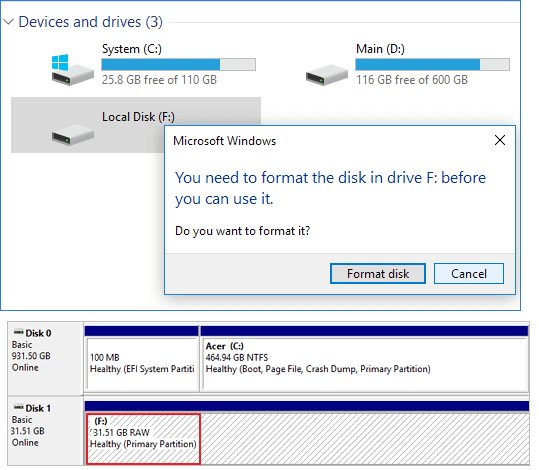
If you have the possibility, try to insert the same USB key in another computer with Windows: if this does not work or returns the error ” Disk drive not formatted “,
Try to reformat it following the procedures I have shown you in this guide; if this option fails, you may have to consider purchasing a new key.
If, on the other hand, the USB drive is fully functional on a second PC, then continue reading the following sections, as the problem is to be found in the computer you are using.
Verify that the USB ports are enable
Sometimes, it can happen that the USB ports of the computer are disabled by the operating system for a number of reasons beyond the user’s control: to check if this is the case, you must go to the device management panel of Windows 10 and enable again if any ports are disabled.
How? Very simple: right-click on the Start button (the flag-shaped icon located in the lower-left corner of the screen), click on the Device Manager item located in the menu that opens, and wait a few moments for the management panel to be fully loaded.
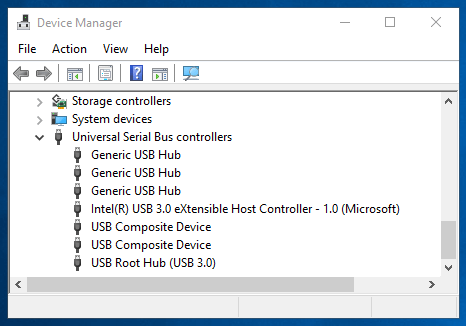
At this point, locate the USB Controller item, click on it to expand it, and check if one or more USB ports on the computer are disabled: in this case, there should be a black symbol next to each of them.
To enable them again, right-click on the icon of the port in question and select the Activate item from the menu that appears: then wait for the port to be reactivated (after reloading the list of devices, the black symbol should disappear), insert the USB stick into the computer and verify that it is finally opened.
Reset the USB controllers
Read Also: How to Recover deleted files from USB free online
Did not even the previous solution restore the correct functioning of the USB ports? The last word is not yet said: you can try to restore their drivers by temporarily uninstalling them from the system.
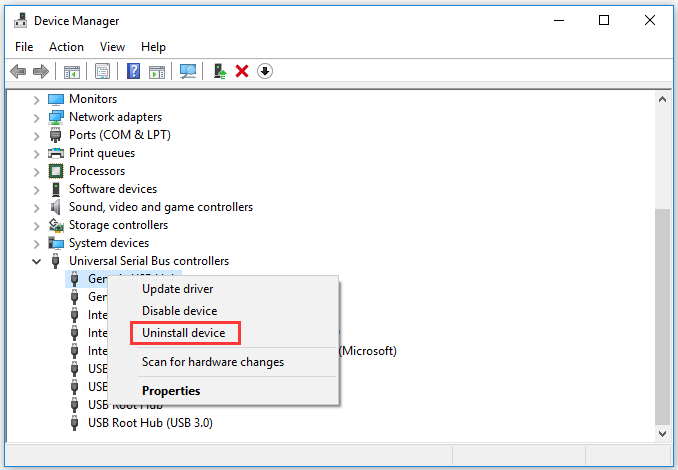
First, therefore, go to the Device Management panel as I showed you a moment ago, expand the item relating to the USB Controller, right-click on each of the devices listed in its correspondence and select the Uninstall item from the proposed context menu.
After completing this procedure, restart your computer, wait for Windows to automatically install the device drivers, and try connecting the USB stick again.
Unlock the USB ports
Haven’t you been able to open a USB Drive on Windows 10 yet? As a last resort, I recommend that you see if access to the USB ports has been blocked, voluntarily or unintentionally, via the registry.
To begin, press the key combination Win + R, type the Regedit command in the small window that opens, press the Enter button, and then the Yes button to grant the necessary permissions to the system registry.
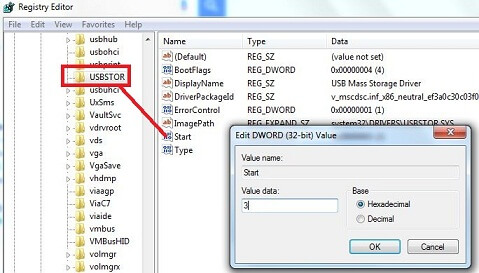
In the window that opens, locate the left sidebar, and repeat the operation on the System, CurrentControlSet, and Services items.
Now, click on the USBSTOR item, identify the Start key located in the right part of the register, and double-click on it: type the value 3 in the box below the Value data item: attached to the window that opens, click on the OK button and restart the computer.
Once this step is complete, insert the USB stick back into your computer and, if everything went well, you should finally be able to read its contents.
Read Also: How to Creating Windows 11 Installation USB flash drive – See it step by step
How do you say? Couldn’t you figure it out this time either? As a last resort, I advise you to take a look at the settings panel of the antivirus or any other protection program you have installed on your computer: you may have inadvertently activated the reading block of external USB devices.
If you want to stay up to date, follow us on Instagram, and Twitter. If you want to receive support for any questions or problems, join our Facebook Page or contact us on Gmail, Linkedin, etc

Pradeep Sharma is a author the mind behind Techjustify, where I craft insightful blogs on technology, digital tools, gaming, AI, and beyond. With years of experience in digital marketing and a passion for tech innovation, I aim to simplify complex topics for readers worldwide.
My mission is to empower individuals with practical knowledge and up-to-date insights, helping them make informed decisions in the ever-evolving digital landscape.