How to reduce photo size as desired – The size of the photo consists of two aspects, the first is the dimensions of the length and width.
Which are usually measured in pixels, and the second is the capacity or the size of the photo file which is measured in KB or MB.
When you reduce the dimensions of a photo, usually the size of the photo file capacity will also decrease automatically.
There is also the term photo compression which allows you to reduce the capacity of the photo file without reducing its dimensions, this is usually done by reducing the quality of the photo.
On this occasion, we will provide a tutorial on how to reduce the size of a photo as desired, both in terms of dimensions and file size or capacity.
This will be very useful when you need a photo that must not exceed a certain size, such as when registering for civil servants, applying for jobs online, or uploading photos on other sites.
Table of Contents
How to reduce the photo size as desired
1. Download and install the Photoscape X . application
To be able to reduce the size of a photo both in terms of dimensions and capacity as desired, we need the help of a photo editor application called Photoscape X.
This application is a free editor that can be used on PCs and laptops with Windows 10 and macOS operating systems.
Please download the application first here: Download
After the application file has been downloaded, then please install the application on your computer as usual.
2. Run the editor application that has been installed
Once installed, run the Photoscape X application by double-clicking on the icon that appears on the desktop.
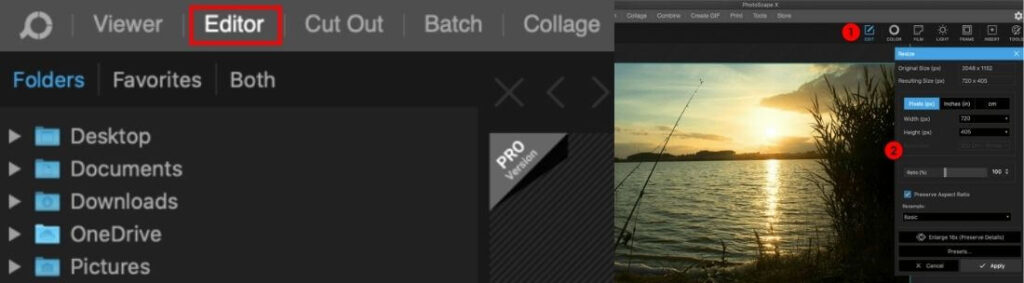
On the main page of the application, click the Editor tab in the menu bar at the top.
3. Enter the photo you want to reduce the size into the application
The next step is to enter the photo you want to reduce in size to the Photoscape X editor application.
In the middle of the editor screen, click the Open button > select a photo file.
4. Reduce photo size
At this stage you can choose to reduce the size of the photo dimensions (length and width) by resizing or cropping.
Another option, you can also directly reduce the size of the photo file capacity without having to reduce the dimensions.
We will practice one by one.
Reduce photo dimensions
- On the top toolbar click the Edit menu
- Then on the right side toolbar click Resize
- Determine the desired length (width) and width (heigth), can be in units of pixels, inches, cm
- Use Ratio (%) column to automatically shrink photos using percentage
- Check the Preserve Aspect Ratio option to keep the photo size proportions
- When finished, click the Apply button
Crop the photo to get the dimensions you want
The resizing process that we did earlier will adjust the width and height sizes automatically based on the aspect ratio.
As in the example above, the resized image has a size of 720×405 pixels. For example, if you want the size to be 720×360 pixels, you have to crop it.
- On the right side toolbar click Crop
- Click and hold on the image then drag until you get the size you want
- You can also use the Custom menu > check the Size option > enter the desired size > OK > drag the crop area to the desired position
- When finished, click the Apply button
Save the resulting image with the file capacity you want
After getting the size you need, you can then save the edited photo to your computer. At this stage, you can determine for yourself how much file capacity you want.
Perform the following steps:
- Look at the menu bar in the lower right corner of the application
- Click on the Save button
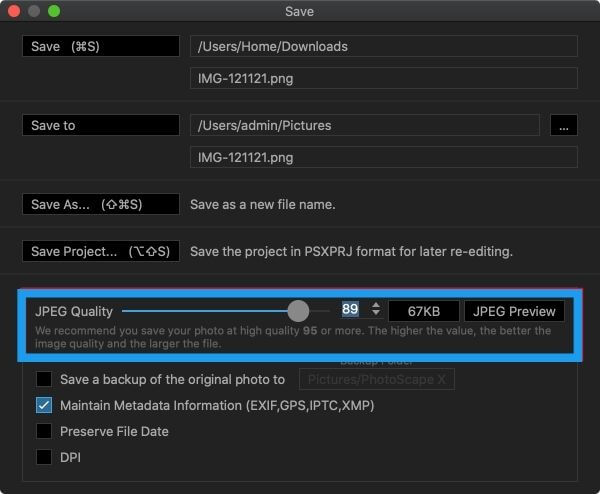
- The save settings dialog box will appear
- In the JPEG Quality section, please adjust the numbers to get the file capacity you want
- The lower the JPEG Quality value, the smaller the file capacity will be, but this has an impact on the quality of the resulting photo later
- When finished, please click the Save As button then select the desired storage location
As you can see in the screenshot above, the image we edited is 720×360 pixels in size with a capacity of only 67KB.
Reduce the capacity of the photo without reducing its dimensions
The second alternative is to reduce the photo capacity without having to change the photo dimensions.
This can also be done using the Photoscape X application.
- First open the Photoscape X application then go to the Editor tab
- Click the Open button then select the photo file
- In the menu bar in the lower right corner, click the Save button
- Set the JPEG Quality to get the file capacity you want
- Click the Save As button then select a file storage location
- Finished
By using the above method, we can reduce the photo capacity without reducing the size of the resolution.
Reduce the size of the photo at once many
If there are many photos that you want to reduce in size, it will be more effective if you do it all at once using an application that supports bulk editing.
One application that you can use to resize and crop photos at once is FastStone Photo Resizer.
Follow these steps:
1. First download and install the FastStone Photo Resizer application first Download
After the download is complete, run the application by double-clicking the icon that appears on the desktop. This application can be run on the Windows 10 / 8 / 7 operating system.
2. Collect all the photo files you want to edit in one folder
This is intended to make it easier for you to select files and make edits later.
3. Open the FastStone Photo Resizer application that was already installed
Next, you open the FastStone Photo Resizer application by double-clicking on the application icon on the desktop
4. Insert photos into the application
On the main page of the application, click on the browse button (three dots) on the top bar and then select the location of your photo folder.
5. Click button Add All
Then you press the Add All button in the middle panel to insert the photo into the editor.
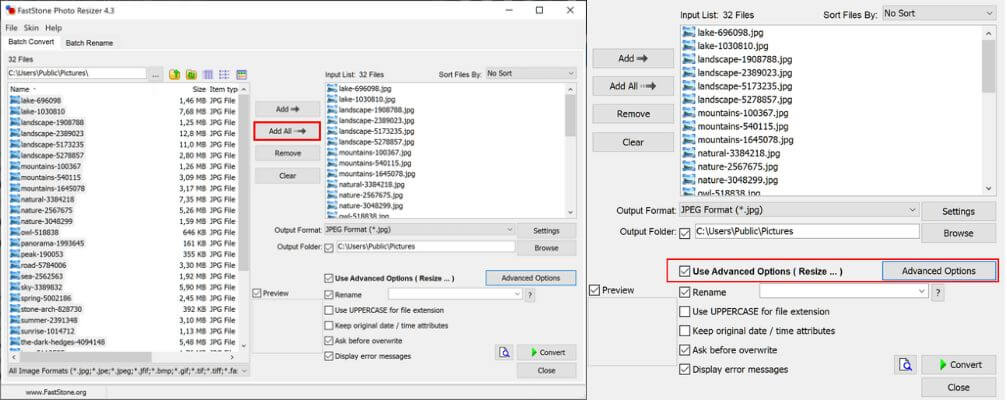
6. Go to the Advanced Options menu
Then you check the Use Advanced Options (Resize) option then click the Advanced Options button
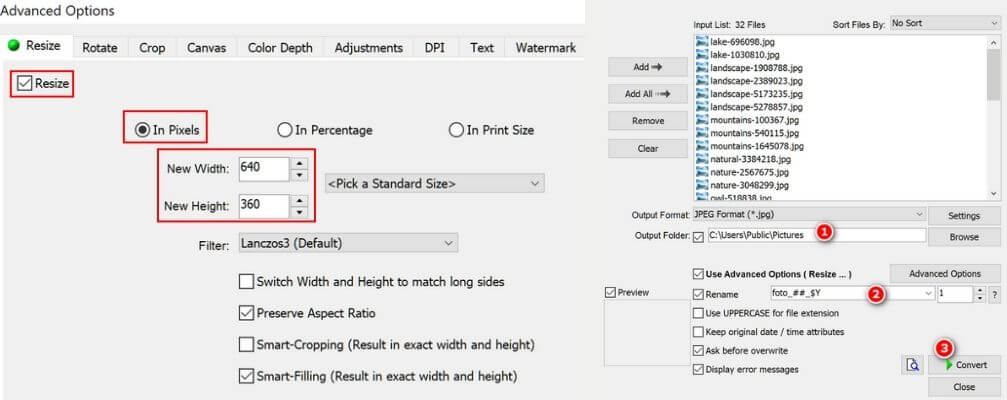
7. Specify the settings to shrink the photo as desired
In the window that appears, click on the Resize tab and check the Resize . option
Also check the In Pixels option
In the New Width section , enter the desired photo width size
In the New Height section , enter the desired length of the photo
Click OK
8. Specify the storage location for the result file
In the Output Folder section, click the Browse button and then select the location where you want to save the edited file later.
9. Specify the name of the resized file
Check the Rename option then type the desired file name. You can use wildcard characters to automatically name photos.
The following characters can be used and their functions:
# = one consecutive digit number
* = original file name
$P = folder name
$Y = current year
$M = current month
$D = day name
$H = hours
$N = minutes
$S = seconds
For example, if you rename it with the name foto_##_$Y then the result will be foto_01_2021.
10. Press the Convert. button
Finally, when everything is set as desired, press the Convert button to start the editing process. Then wait for it to finish
When finished, you can check the resulting photo files in the folder according to the settings you specified earlier.
Automatically reduce the size of the photo capacity without the application
For those of you who want to be able to reduce the size of photos automatically but without using additional applications, you can use this third method, namely using a web-based editor that can be used for free.
Follow these steps:
1. First collect all the photo files you want to edit in one folder to make it easier for you to select them.
2. Make sure the laptop or PC you are using is connected to the internet, then open the browser application .
3. After that go to the following web page: https://tinypng.com/
4. Upload all the photos you want to edit to the site by drag-dropping the photos directly into the column provided. You can also click on the arrow button then select all the photos you want to edit.
5. Wait until the process is complete. All photos that you uploaded earlier will be compressed automatically to reduce the size of the file capacity.
6. Download the compressed photos to your computer by clicking on the Download All button .

Using this third method is very practical if you want to reduce the capacity or size of large files quickly.
In addition, the image compression on this site is also good enough to reduce the size of the photo file that is too large.
Conclusion
So, those are some ways that you can try to reduce photo size as desired, both in terms of dimensions and file size. Good luck, hopefully useful. If you find difficulties, don’t hesitate to ask in the comments column.
We are always open to your problems, questions, and suggestions, so feel free to Comment on us by filling this. This is a free service that we offer, We read every message we receive.
Tell those we helped by sharing our posts with friends or just liking to Follow us Instagram, Twitter and join our Facebook Page or contact us on Gmail, Linkedin, etc

Lokesh Sharma is a digital marketer and SEO expert at TechJustify with a keen interest in emerging technology trends including AI, cybersecurity, and digital marketing tools for more than 5 years. He writes clear, actionable articles for tech enthusiasts and business leaders, simplifying complex topics like VPNs, automation, and generative AI.