How to thoroughly clean your PC: Eight guidelines – How to thoroughly clean a computer? Think of your PC, your laptop, the computer where your child makes PowerPoint, or the tower of your work. If they have a Windows 7, 8, or 10 operating system installed, all of them have a lot of resources and more or less hidden sections that will speed up and clean your PC then optimize the performance of the computer.
We have already talked on other occasions about how to optimize our team. With this guide you will achieve not only a more immediate start, but also a good handful of free gigs and a superior fluency when executing such basic commands as opening a folder.
Table of Contents
Uninstall what you don’t use
To uninstall applications we must always follow this route: Start> Settings> Applications and features.
There, we are selecting all the ones that we do not want on our computer by clicking on the bottom drawer that says ‘ Uninstall ‘. And what to erase? Games, applications of great weight related to audio or video, resources that we only use once for old formats, etc.
In previous versions for Windows, we will have to follow another route: Start> Control panel start> Uninstall a program . In other cases, we will go to the Add or remove programs section .
All the apps will appear here, classified by publisher, installation / opening date and file size. We choose the ones we don’t want to use and delete them.
We can also go to third-party applications, such as Revo Uninstaller . We do not recommend it in Windows, because it is a self-sufficient operating system in these tasks.
Clear the cache
Which brings us to the next point: the cache is the great enemy. It is essential to memorize the status of the applications. Those that we use, of course.
Because when we ask the system to delete some programs, they are clean your PC is usually kept in an intricate folder path within other folders. The installer or executor will disappear, but many local files will pile up taking up space and disk reads .
Most apps have their own user cache. And cleaning thoroughly implies erasing. If we haven’t done it for a long time, we can follow this path to find out what we have: C: \ Users \ username \ AppData .
Within each app it will be common to find three folders: ‘Local’, ‘LocalLow’ and ‘Roaming’. Each folder has other subfolders of local files. Pay attention to us, delete them all. Every time we delete or uninstall an application, we should follow this process to completely eradicate the residual files.
To restore the cache, we open the settings in Windows 10, go to Applications> Applications and features , and choose ‘Microsoft Store’.
Once here, click on the blue message ‘ Advanced options / Advanced settings’. We go down to the ‘ Reset’ drawer and this will remove open data and processes, while restoring the application cache.
Also Read : How to see if your PC is 32 or 64 bit Windows 10
Another way to delete all temporary files with one click is through here: Configuration> System> Storage . And we go, one by one, section by section, choosing what we are going to do without, with emphasis on the ‘ Files section temporary ‘ .
We choose thumbnails, dump, records, etc. and click on ‘Remove files’ . This restores all installations as new .
Death to duplicates and old copies
To delete duplicate images, we can go to a software like Find.Same.Images . It is also possible to opt for alternatives such as Easy Duplicate Finder. Anyway, we download this application in the 32 and 64-bit version, depending on our operating system.
We will obtain a ZIP that we will have to unzip. Once open, we install the app and click on ‘Start’.
The system will search for duplicates. Where? Where we say: click on the three-point and three-point buttons with addition and choose the folders to be analyzed. If we want to search the entire system, we will choose the main hard drive (C :). When we find the results, we can decide what to delete.
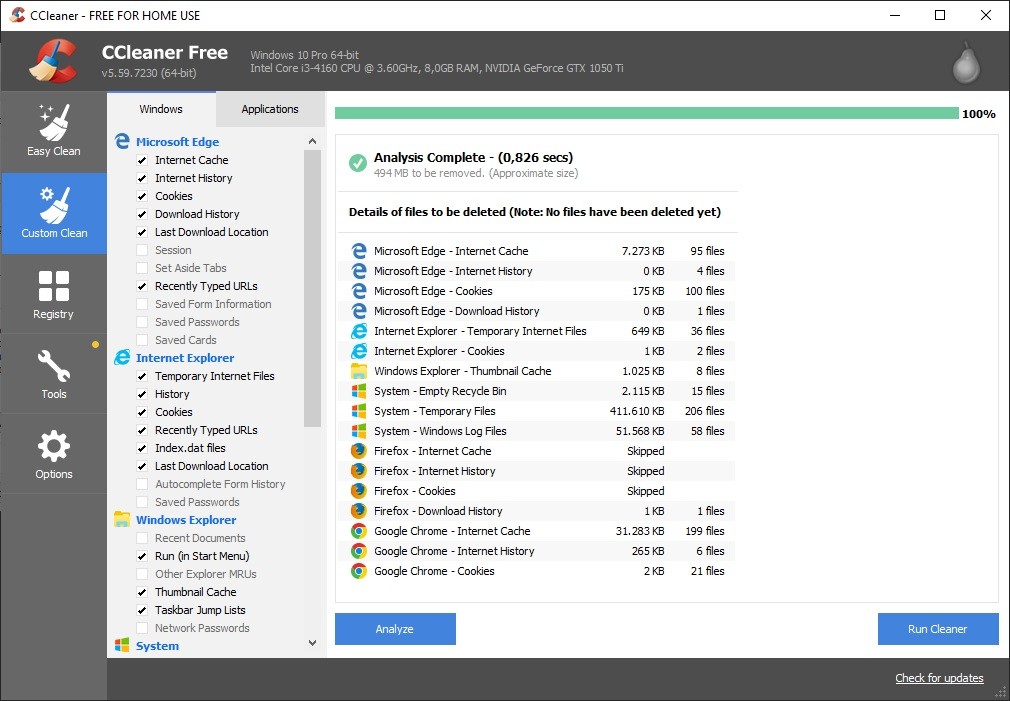
Other apps like Anti-Twin and CCleaner also provide the option to erase duplicates in audio files and documents. The correlations correspond to the date, file weight, name, type or format , and so on. About these apps, our advice is to install them, use them as needed and uninstall them later.
Goodbye to useless things
The equipment is marketed with direct access to different applications. They are commercial agreements in which, as users, we do not have much to say. But we do have the opportunity to delete those files that we consider unnecessary. And, in the end, it all adds up.
If we want to restore or fix the Microsoft Store applications, we follow this path: from ‘ Start’ (system icon) we go to ‘ Run’ and we write the WSReset.exe command. We press ‘Accept / OK’ and that’s it. When you reload the store you will be able to open it without problem.
To uninstall the store, you have to go to PowerShell (the blue screen). Let’s go to ‘Start’, look for ‘ Windows PowerShell’, and click on it with the right mouse button to apply the option ‘ Run as administrator’ . We press ‘Enter / OK’ and we introduce the following command Get-AppxPackage -name * WindowsStore *.
Now we follow the store installation location path. It is usually located in C \ Program Files \ WindowsApps \ Microsoft.WindowsStore_ (serial-number) .
Open Notepad, copy and paste right click or through the command Ctrl + C and Ctrl + V . We press’ Enter / OK ‘and’ Get-AppxPackage Microsoft.WindowsStore | Remove-AppxPackage ‘ .
At other times, it will appear as’ Get-AppxPackage * windowsstore * | Remove-AppxPackage ‘. Both options are identical, they only refer to the name of the Store.
By deleting the store, we will remove shortcuts such as ‘Get Office’, ‘Get Skype’, ‘Groove Music’, ‘Maps’, ‘Weather’ (bingweather), the news (sports, finance, access to newspaper summaries, etc. ) and games like Solitaire.
Clean thoroughly (and fit)
Sanitizing the disk requires eliminating temporary files, installations without much value, old copies, duplicates, useless elements and everything that we send to the ‘Recycle Bin’.
In this particular, we recommend automating the deletion of files in the trash through Settings> System> Storage and activating the first option above.
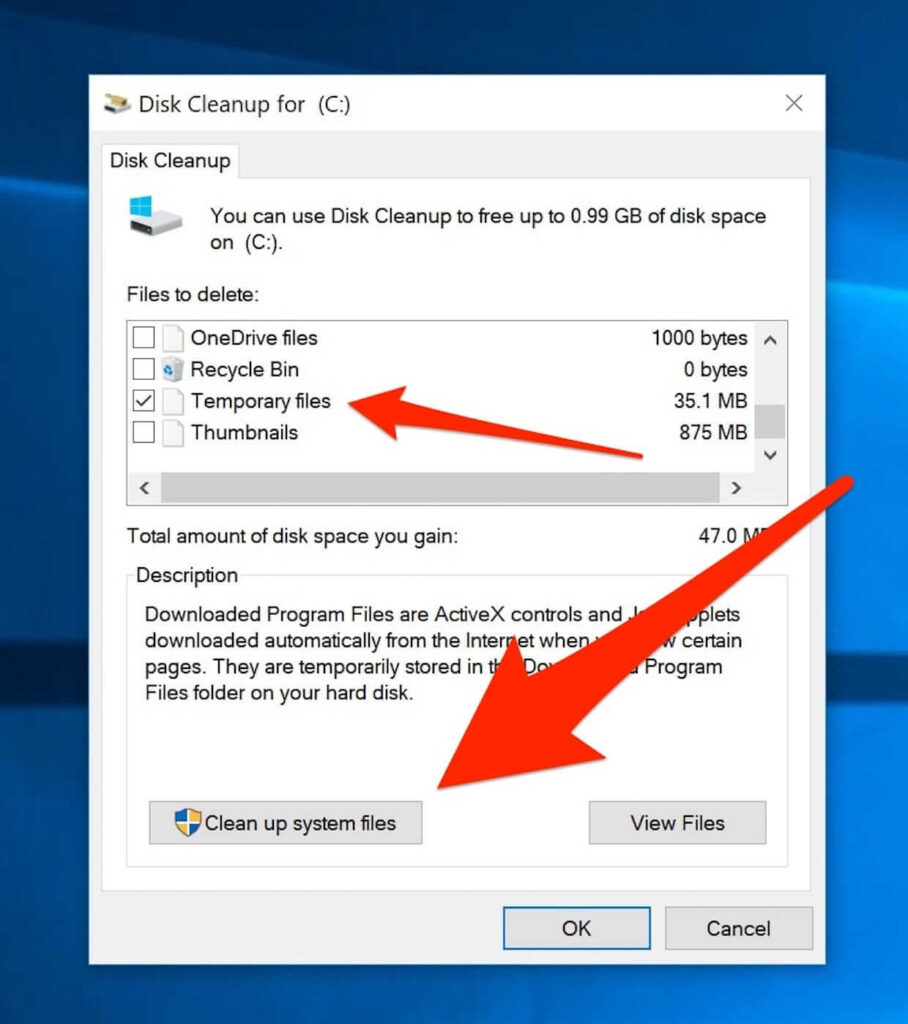
Fortunately, Windows 10 has its own ‘cleaner’. We will find it by opening the ‘Start’ menu and typing cleanmgr . The Disk Cleanup app will be displayed .
We will right click on the menu, press ‘ Run as administrator’ (essential) and we will find a new options window. We will have to choose the hard drive that we want to clean.
The app will calculate how much it can clean: residual antivirus files, registries, temporary Internet files, deletion of old updates, etc. We select all those folders that we want to delete, click ‘OK’ and that’s it.
Read Also How to open a USB stick on Windows 10
We can also activate the storage sensor by following this path: Home> System> Storage . Once there, click on the ‘ Configure Storage Sensor ‘ button . In this section, we can activate the sensor, which will eliminate obsolete temporary files by date (we can choose the frequency, 30 days, 60 days, etc.) or by reason (when there is little space, continuously …).
Defragment what?
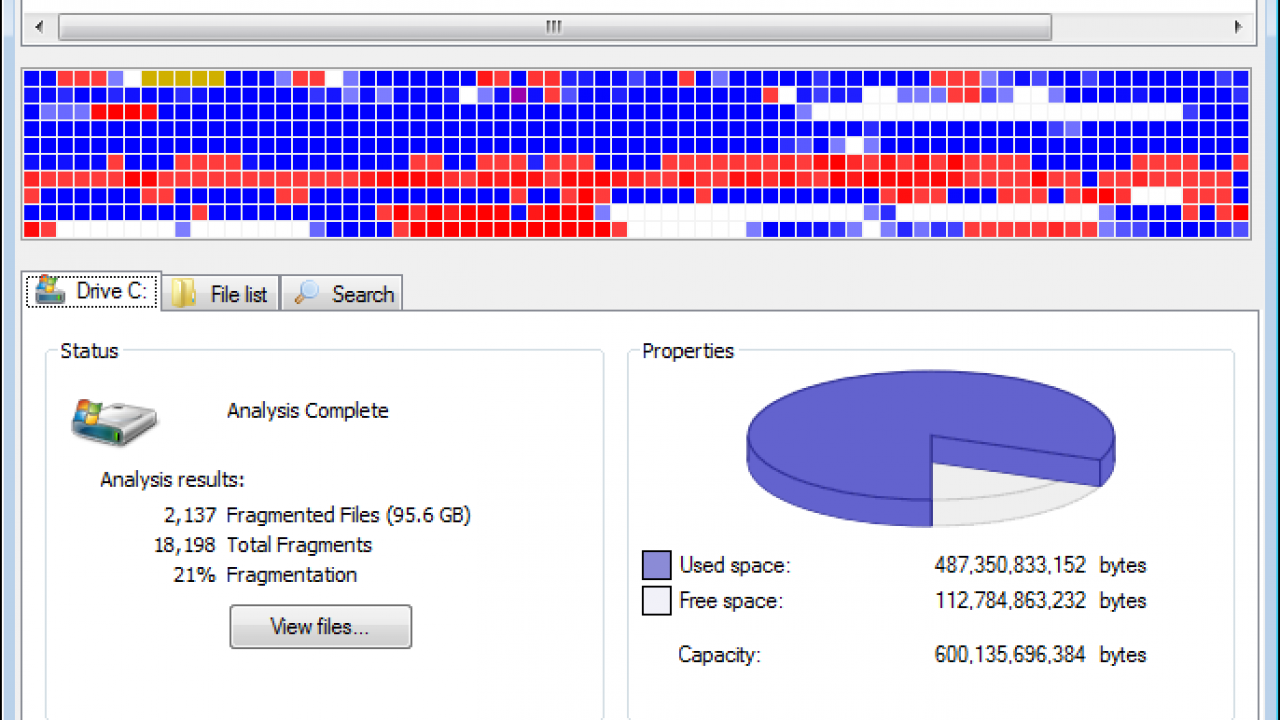
Defragmentation is not for “deep cleaning,” but for tidiness. It’s an old acquaintance that boosts performance, achieving smoother, more agile executions. And it does so by rearranging the information sectors of the system, matching by proximity.
Along the way, we will gain space and extend the life of the disc . Newer SSDs no longer need this option. On the other hand, its execution is advisable in any installation that has an HDD as a matrix disk.
And how is it executed? Following this path: Start> Defragment and optimize drives . Next, we right-click and scroll down to ‘ Properties’ , to avoid arbitrary use. Within this new window, we will have eight tabs. Click on Tools> Defragment drive> Analyze .
This button will open the defragmenter, which we will run in the background. In the meantime, we can clean your PC continue cleaning in other sections.
Defragmentation is useless if the disk is fragmented below 10%. Therefore, it is not the best that this task is carried out automatically on a daily or weekly basis, but it is preferable that we carry it out on time.
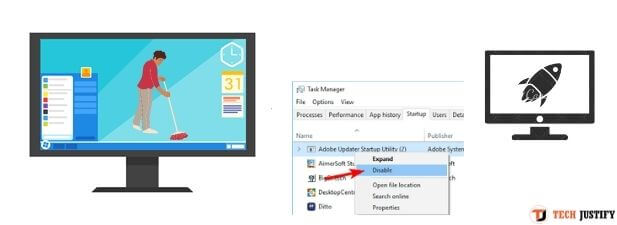
Startup programs, that great devourer of resources
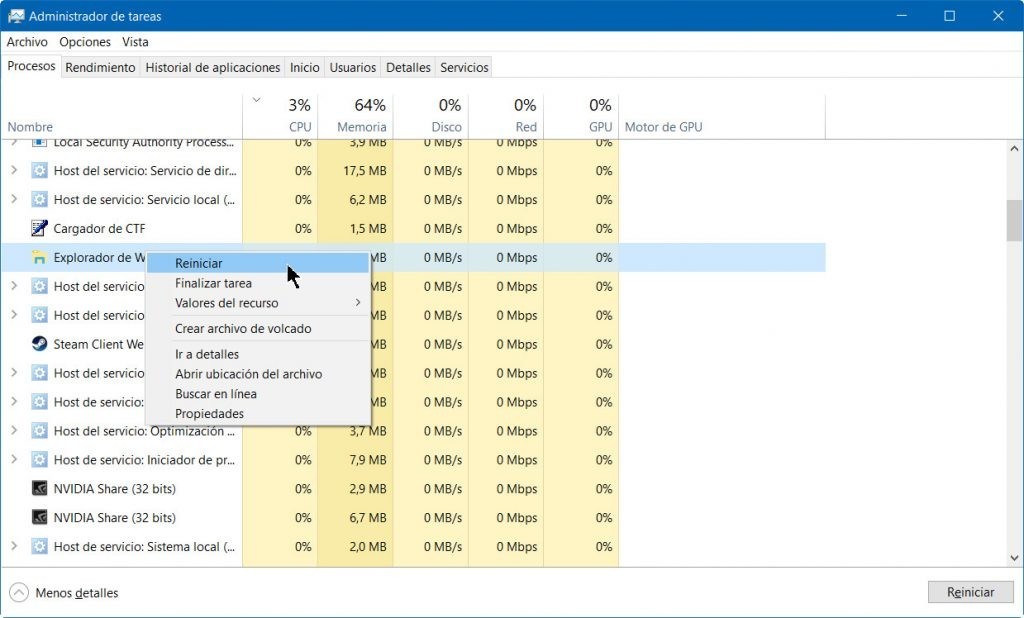
In many cases, programs that open automatically when the system starts up are not necessary at all – like Skype, for example.
To avoid this situation, we press Control + Alt + Delete and choose the option ‘ Task Manager’ . We can also follow the path System Configuration> Boot .
Applications can be classified by the startup impact they generate. Once here , and based on this information, click on ‘ M ost details’ and go to the Start column, the fourth tab.
In it, we can disable or put to hibernate those apps that we do not want to use. The idea is not only to disable apps, but to prevent them from starting again at the next system boot.
Desktop: the fewer icons, the better
In this matter, it is advisable to be cautious: as with the downloads folder, the desktop slows its performance the more files are present. Each folder, like an orderly room , is more livable the fewer objects it has lying around.
Therefore, it is practical to delete the icons that are not essential: ‘Trash’ and ‘My Computer‘. A browser shortcut can be embedded in the shortcut bar. And the same happens with other frequently used apps.
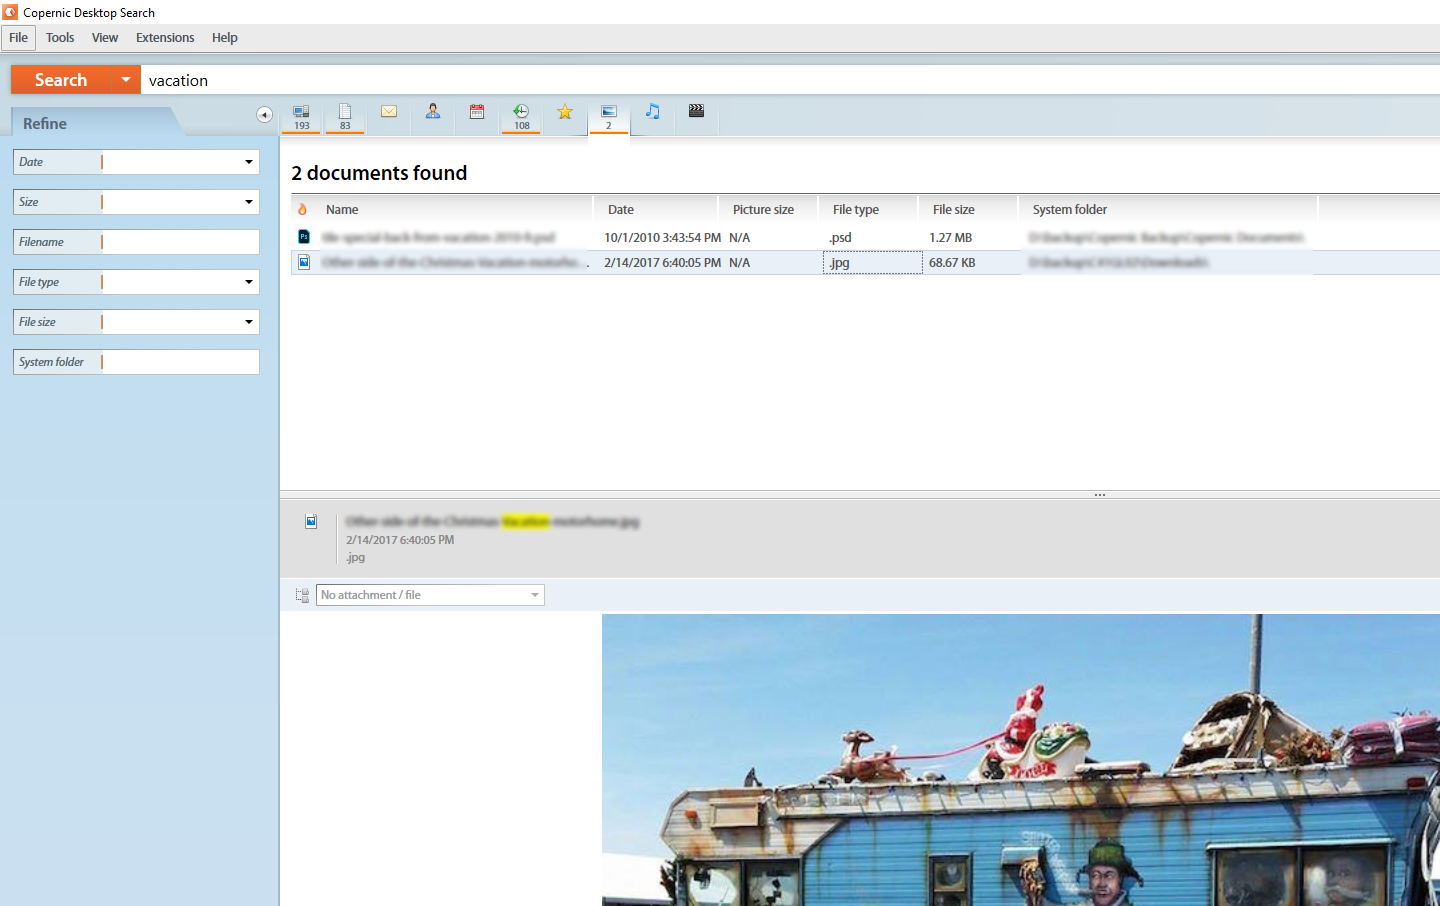
If you need an app container, you can create a folder folder. Programs like Copernic help index files but don’t forget: the accumulation of icons is your enemy. And, if you want to create a new desktop, you can do it using the command Ctrl + d + the Windows icon .
And on the outside?
And since we have cleaned the equipment on the inside, how can we not also do it on the outside? For a good cleaning and disinfection of the physical part, these are the steps to follow:
- Have a slightly damp, soft, lint-free cloth handy (no ammonia, no ethyl alcohol, or chlorine-based wipes).
- We apply the cleaner on the cloth. A large quantity is not necessary.
- We clean the surface using a circular motion and taking care to avoid drops accumulated by excess liquid. We carry out this task until the entire surface is dry.
- We can repeat the process and clean the surface again, if we are not satisfied, using a soft, dry, lint-free cloth.
To clean the keyboard we can use a cleaning kit and key disassembly or, if we do not need such an exhaustive cleaning, it is possible to use a little isopropyl alcohol applied to a cloth.
Then clean between the keys with a cotton swab and make sure that no liquid drips between them. In no case should you restart or spray or wet the key mechanism.
Finally, for a good LCD / LED screen cleaning, here are these tips :
- First we gently clean the screen with a soft, dry, lint-free cloth. In this way, we will remove a large part of the dirt.
- Next, we moisten a soft, lint-free cloth using a 70-30 mixture of isopropyl alcohol and water (distilled or deionized).
- With a small amount of this preparation, we clean the screen by making circular movements, without pressing too much and always applying the liquid on the cloth, never directly on the screen.
- We collect the remains, waiting until it dries and the result looks completely clean.
If you want to stay up to date, follow us on Instagram, Twitter. If you want to receive support for any questions or problems, join our Facebook Page or contact us on Gmail, Linkedin, etc

Pradeep Sharma is a author the mind behind Techjustify, where I craft insightful blogs on technology, digital tools, gaming, AI, and beyond. With years of experience in digital marketing and a passion for tech innovation, I aim to simplify complex topics for readers worldwide.
My mission is to empower individuals with practical knowledge and up-to-date insights, helping them make informed decisions in the ever-evolving digital landscape.