How to change DNS in Windows 11 and enable DNS over HTTPS? We’ve already explained here on the site how to change DNS in Windows 10.
Now in Windows 11, you can also change the operator’s DNS to the service you prefer and still enable the DNS protocol over HTTPS (DoH).
This protocol encrypts the DNS resolutions that the computer makes while you surf the web, increasing your privacy and security, preventing the interception and manipulation of DNS data.
Which DNS server to use?
You can choose the public DNS server you prefer as long as it supports “DNS over HTTPS”. Currently, these are the ones that support “DNS over HTTPS” in Windows 11:
- IPv4
- Google Primary DNS: 8.8.8.8
- Google Secondary DNS: 8.8.4.4
- Cloudflare Primary DNS: 1.1.1.1
- Cloudflare Secondary DNS: 1.0.0.1
- Quad9 Primary DNS: 9.9.9.9
- Quad9 Secondary DNS: 149,112.112,112
- IPv6
- Google Primary DNS: 2001:4860:4860::8888
- Google Secondary DNS: 2001:4860:4860::8844
- Cloudflare Primary DNS: 2606:4700:4700::1111
- Cloudflare Secondary DNS: 2606:4700:4700::1001
- Quad9 Primary DNS: 2620:fe::fe
- Quad9 Secondary DNS: 2620:fe::fe:9
You have to choose the two pairs of these DNS servers (primary and secondary) that you will want to use.
See how to change DNS in Windows 11 and enable DNS over HTTPS
1. Open Windows settings, click the start button, and then the Gear Settings icon. Those who prefer can right-click on the start button and select “Settings”.
2. In the left menu click Network and Internet.
3. On the right side click on Wi-Fi if you are using a wireless connection on your computer. Or click Ethernet if you are using a wired connection to your computer.
4. If you chose “Wi-Fi” click Hardware Properties. If you click on Ethernet you don’t need it, the next screen will open.
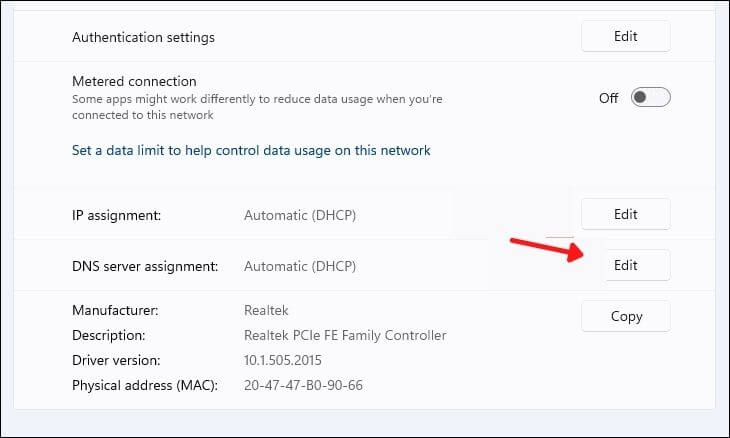
5. Look for the “DNS Server Assignment” field and click Edit on the right side.
6. Click on “Automatic” and change to Manual.
7. Click the button in the IPv4 field to enable it.
8. In the “Preferred DNS” field enter the primary DNS you want to use, and in the “Alternate DNS” enter the secondary DNS. Then click on the “Preferred DNS Encryption” field under each one and change it to encrypted only (DNS over HTTPS) .
Please be careful when entering the primary and secondary DNS numbers, if you enter something wrong, it will cause errors in your connection!
9. Scroll down the window and activate the button next to IPv6 .
10. Repeat the process by entering the primary DNS in the “Preferred DNS” field and the secondary DNS in the “Alternative DNS” field. Click on the “Preferred DNS Encryption” field under each and change it to encrypted only (DNS over HTTPS) .
11. When you return to the connection properties screen, the DNS entered will appear in the “DNS server assignment” field with the words “Encrypted” in parentheses.
Conclusion
Okay, you can close the settings window, now you are using DNS over HTTPS in your Windows 11 connections.
If the computer gets a strange connection, it may be that your connection does not support IPv6, disable the IPv6 button within the “DNS server assignment” which should return to normal. You can test IPv6 on this test-ipv6.com test page.
We are always open to your problems, questions, and suggestions, so feel free to Comment on us by filling this. This is a free service that we offer, We read every message we receive.
Tell those we helped by sharing our posts with friends or just liking to Follow us Instagram, Twitter and join our Facebook Page or contact us on Gmail, Linkedin, etc

Pradeep Sharma is a author the mind behind Techjustify, where I craft insightful blogs on technology, digital tools, gaming, AI, and beyond. With years of experience in digital marketing and a passion for tech innovation, I aim to simplify complex topics for readers worldwide.
My mission is to empower individuals with practical knowledge and up-to-date insights, helping them make informed decisions in the ever-evolving digital landscape.